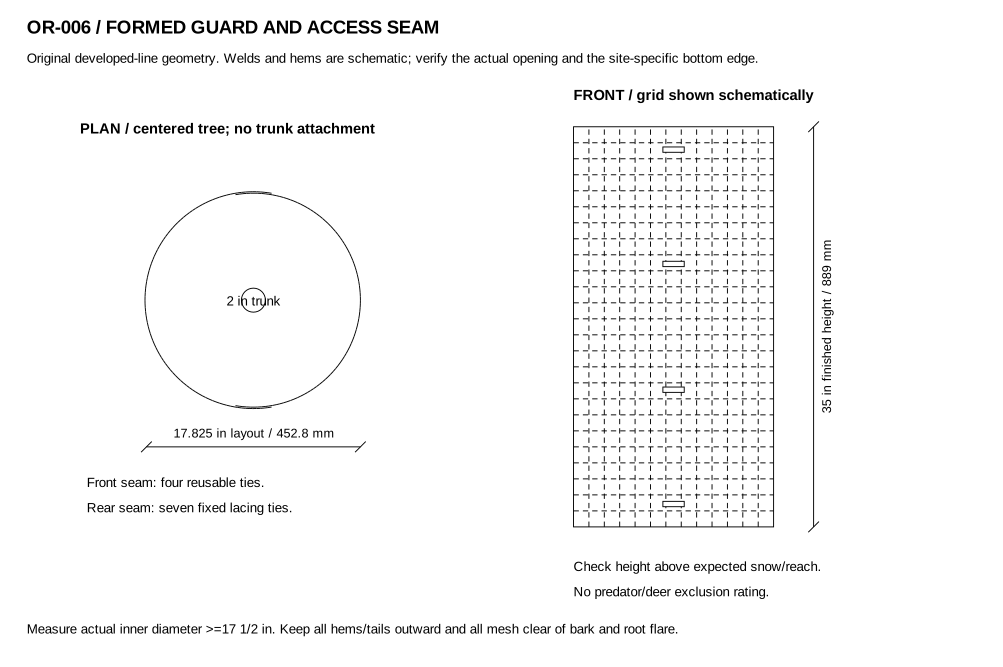
OR-006 / Form a broad hardware-cloth guard with a fixed rear laced seam and a separately releasable front overlap, so the trunk and ground can be inspected without cutting a closed cylinder apart. Nothing is fastened to the tree.
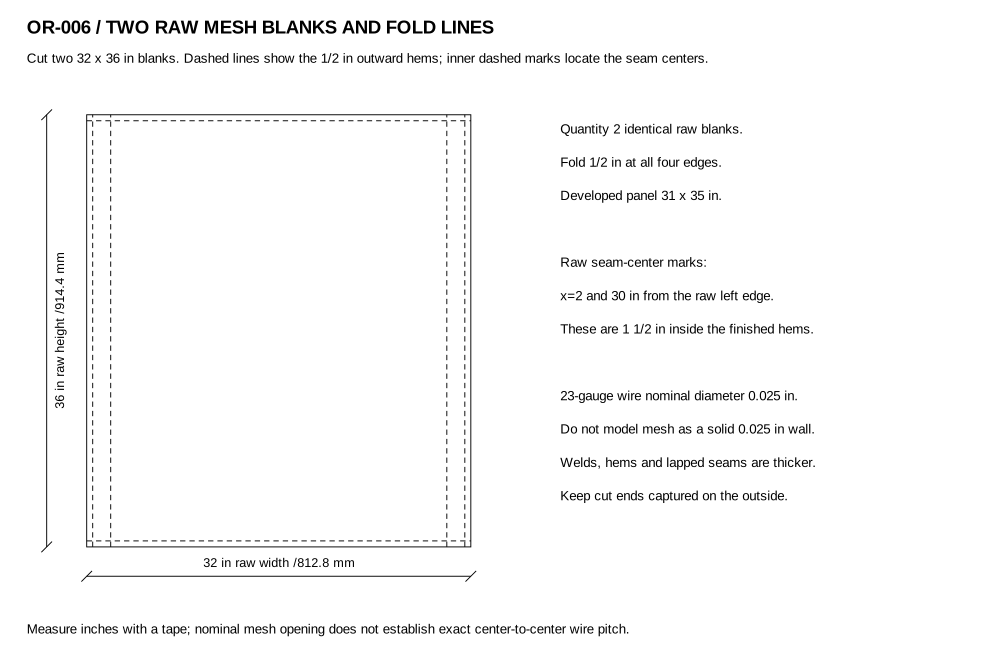
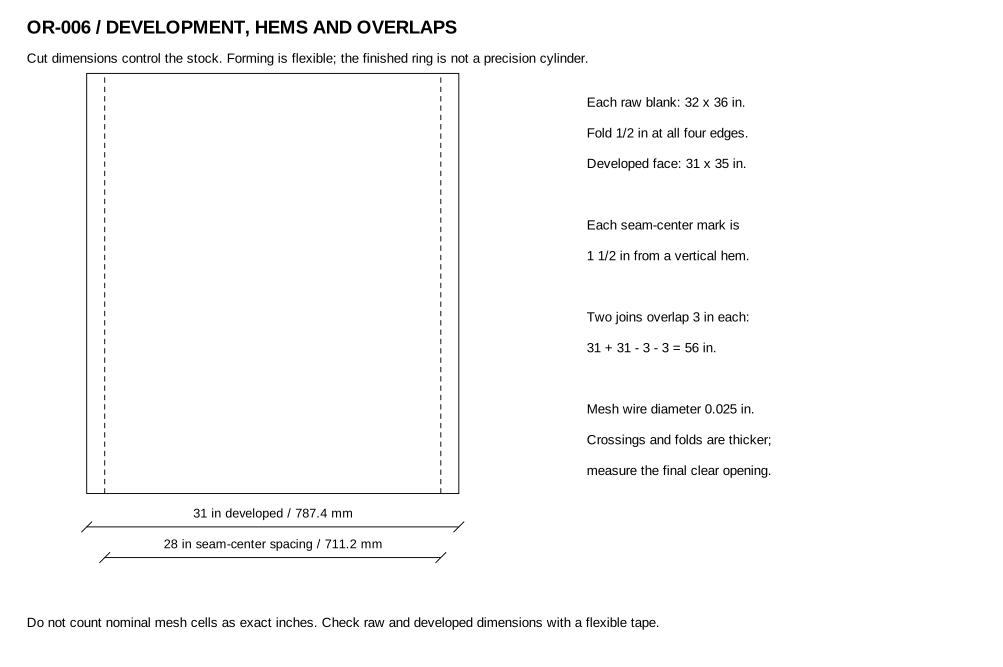
Two 32 x 36 in blanks (812.8 x 914.4 mm), each hemmed 1/2 in on four edges, become 31 x 35 in developed panels. Two 3 in seam overlaps give 56 in developed circumference, layout diameter 17.825 in (452.8 mm). Finished envelope allowance 18 1/4 x 18 1/4 x 35 in; verify a clear inner diameter at least 17 1/2 in. Example trunk maximum 2 in diameter, centered.
This is an inspectable barrier component, not a certified rodent/deer exclusion product. Actual species, expected snow, ground gaps and tree growth determine suitability. Height must remain above the local reach/snow exposure; do not infer protection from the nominal 35 in height alone.
Keep the mesh, hems, ties and anchors clear of bark, branches and root flare. A centered 2 in trunk in the minimum 17 1/2 in opening has 7 3/4 in radial clearance. Remove or enlarge the guard before growth reduces the required local clearance.
Wear gloves and eye protection while cutting/folding wire. Fully fold cut ends outward into hems; no loose wire end points toward the trunk. Do not dig through roots or fasten wire to the tree.
At least 64 in (5 ft 4 in / 1625.6 mm) length from a 36 in-wide hardware-cloth roll; allow spare material for a clean cut and damaged ends.
Seven 6 in (152.4 mm) lengths of soft coated tie wire for rear lacing; four outdoor-rated reusable cable ties no wider than 1/8 in and at least 8 in (203.2 mm) long for the front seam.
Four purchased smooth U-shaped landscape staples, 6 in (152.4 mm) long, only for locations free of roots and buried services; no anchorage/wind rating.
One 56 in (1422.4 mm) nonstretch layout cord, temporary support clips, two straight clamping boards and scrap backing.
Tape measure and combination square
Pencil, clamps and safety glasses
Saw with wood blade; drill/driver and piloting bits
120- and 180-grit abrasive
Wire snips suitable for the mesh; flat-nose pliers; deburring tool; flexible tape
No wood screws or tree fasteners. Seven rear lacing ties and four front releasable ties join overlapped mesh layers. Ground staples locate the guard only; they are not a structural anchoring design.
| Part / quantity | Actual L x W x T | Material / stock |
|---|---|---|
| P01 Flexible mesh half-panel / 2 | 32 x 36 x 0.025 in / 812.8 x 914.4 x 0.6 mm | 1/4 in galvanized hardware cloth, 23-gauge wire nominal 0.025 in; this T is wire diameter, not a solid sheet or folded-wall thickness; Actual 36 x 0.025 in / 914.4 x 0.6 mm section; cut length below |
Each developed panel is 31 x 35 in; rear and front overlaps are each 3 in, giving 31+31-3-3=56 in.
Clear inside diameter is at least 17 1/2 in in two directions, with a centered 2 in trunk leaving at least 7 3/4 in to the nominal circular barrier.
All cut ends are hemmed outward; rear lacing stays secure and the four front ties release without tools.
Ground gaps, snow level and plant growth are actual site checks; no exclusion or wind performance has been tested.
Inspect through the front seam frequently and after storms or snow movement. Keep competing vegetation/debris from hiding damage, and keep the guard entirely free of contact with the living trunk.
Replace torn mesh, failed welds, corroded ties or brittle reusable fasteners. Remove anchors before taking the guard away and flatten only off the tree for storage.
Not performed; no load rating, animal acceptance, yield or durability performance is claimed.
Tree Owner's Manual - Installing a Trunk Guard - Trunk clearance, snow exposure and inspection context; this original openable guard is not an agency-tested exclusion product.
Galvanized Hardware Cloth - Stock Specifications - Published 23-gauge 0.025 in wire and 1/4 in mesh stock in 36 in roll width. Wire diameter is not the total folded seam thickness.