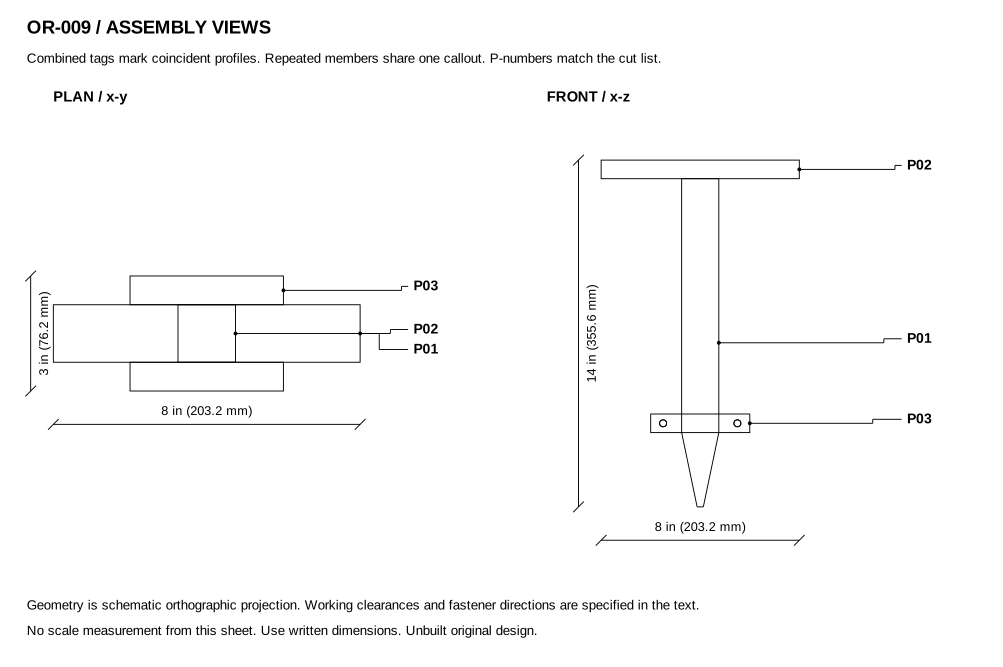
OR-009 / Form a repeatable pilot hole in loose propagation medium using a blunt four-facet point, while a removable split collar limits travel. The tool makes a hole; it does not prescribe a crop planting depth or compact a hard-soil planting pit.
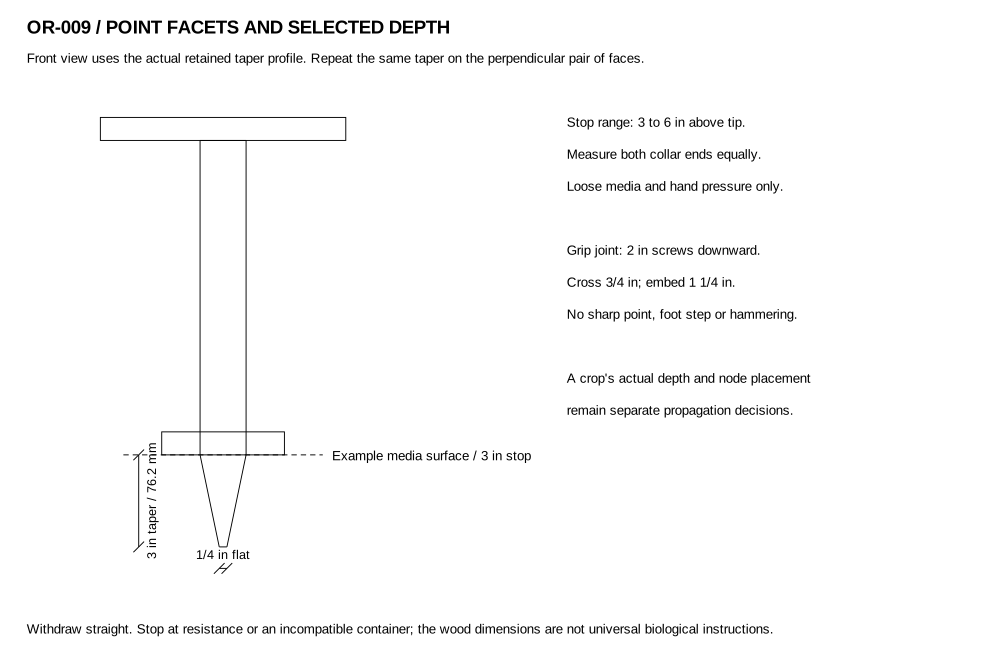
Point-to-handle height 14 in (355.6 mm); 8 in (203.2 mm) cross grip. Point tapers over 3 in to a flat 1/4 in square (76.2 mm taper, 6.4 mm flat). Collar bottom adjusts from 3 to 6 in (76.2 to 152.4 mm) above the tip. Use only with a crop/container protocol compatible with that range.
Loose potting/propagation medium only. No foot pressure, hammering, levering roots or drilling hard soil; withdraw if significant resistance appears.
Hole width/depth does not replace node placement, media or rooting guidance. Check the actual root/cutting and container before use; do not force a shallow container over the tip.
Two #8 x 2 in (50.8 mm) wood screws for the cross grip.
Two 1/4-20 x 4 in (101.6 mm) full-thread hex bolts, four wide 1/16 in-thick washers and two through-thread hand knobs/wing nuts. Do not use a blind knob that bottoms on the bolt before clamping.
One separate rule; soft temporary collar-setting mark. No metal point or blade is installed in the finished tool.
Tape measure and combination square
Pencil, clamps and safety glasses
Saw with wood blade; drill/driver and piloting bits
120- and 180-grit abrasive
Plane/rasp suitable for hardwood; 9/32 in bit; backing wood
Grip screws cross 3/4 in grip and enter the stem end 1 1/4 in. Collar bolts span two 3/4 in blocks plus 1 1/2 in stem width: 3 in before washers/knobs.
Two 1/16 in washers add 1/8 in per bolt stack. The 4 in bolt must engage the actual through knob fully and leave at least two complete threads beyond a wing nut.
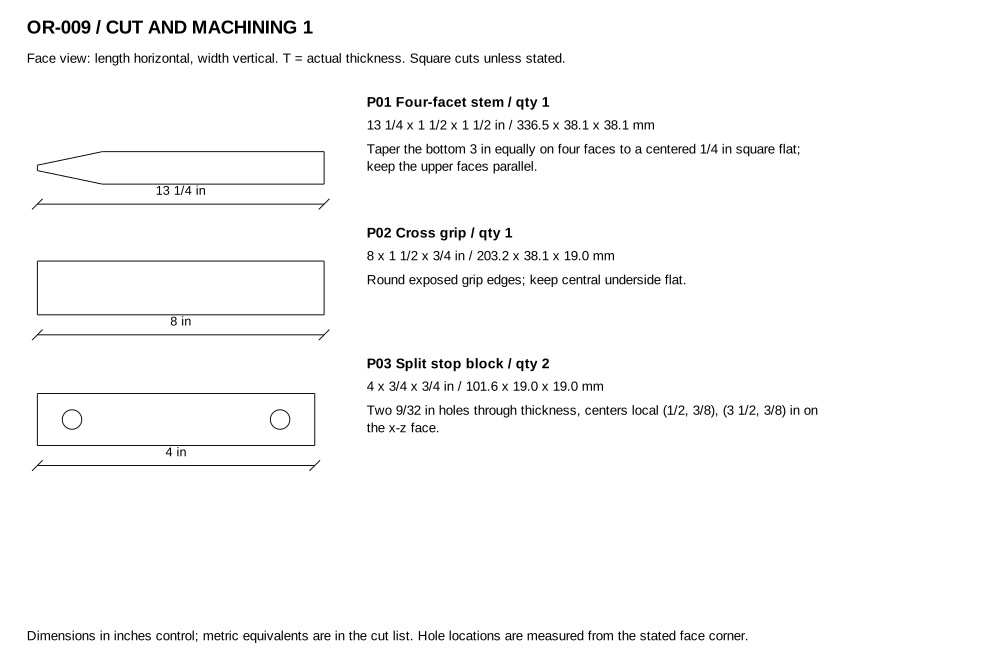
| Part / quantity | Actual L x W x T | Material / stock |
|---|---|---|
| P01 Four-facet stem / 1 | 13 1/4 x 1 1/2 x 1 1/2 in / 336.5 x 38.1 x 38.1 mm | Straight-grained untreated hardwood, measured actual 1 1/2 in square; Actual 1 1/2 x 1 1/2 in / 38.1 x 38.1 mm section; cut length below |
| P02 Cross grip / 1 | 8 x 1 1/2 x 3/4 in / 203.2 x 38.1 x 19.0 mm | Smooth hardwood; nominal 1 x 2, actual 1 1/2 x 3/4 in; Actual 1 1/2 x 3/4 in / 38.1 x 19.0 mm section; cut length below |
| P03 Split stop block / 2 | 4 x 3/4 x 3/4 in / 101.6 x 19.0 x 19.0 mm | Straight smooth hardwood, actual 3/4 in square; Actual 3/4 x 3/4 in / 19.0 x 19.0 mm section; cut length below |
Tip remains a flat 1/4 in square with four symmetric facets; no splinter or metal point.
Grip screws stay buried and the cross grip cannot rotate by gentle hand inspection.
Both stop faces are square at the selected 3 to 6 in depth; actual trial-hole depth agrees before plants are introduced.
Use the actual crop propagation instructions for the root/cutting, and make only a suitable pilot opening. Backfill/firm the medium as those instructions require rather than treating a dibble-shaped void as a planting specification.
Brush off media after use, dry the wood and recheck the flat tip and collar grip. Replace a cracked stem, loose grip or split block; keep hardware clean and lightly moving.
Not performed; no load rating, animal acceptance, yield or durability performance is claimed.
Vegetative plant parts - Stem nodes and propagation orientation; each crop needs its own horticultural protocol.
Home Propagation of Houseplants - Keep covering off leaves and keep plastic-covered cuttings out of direct sun. No universal humidity, rooting-time or crop-success claim.