1 Define the use before cutting
Build two open-front nest compartments inside an existing dry, secure chicken house. Use this example for ordinary adult laying hens that fit the clear openings comfortably; larger breeds need a checked fit and a revised design. The unit requires a sound support and restraint chosen for the actual housing. Its lid opens only by removing four screws. It has no lifting hinge, roll-away floor or outside collection hatch.
The completed outside dimensions are 32 1/4 in wide × 16 in deep × 17 1/2 in high (819.2 × 406.4 × 444.5 mm), using actual 3/4 in (19.05 mm) plywood. Each compartment has 15 in clear width × 14 1/2 in clear depth × 16 in clear height before bedding. These are example construction dimensions, not a stocking guarantee.
Size the flock from both demand and space. For example, a target of 21 eggs per week divided by an editorial planning assumption of 4 eggs per hen per week gives 5.25, rounded to 6 hens. At 3 eggs per hen per week the same target needs 7 hens; during molt or short winter days output may fall much further. The assumed yields are planning scenarios, not promises. Compare the resulting flock with suitable indoor/outdoor space, daily care and local limits before acquiring birds.
UMN Extension describes 3–5 square feet of indoor space per bird and approximately one nest per 4–5 birds. At an example planning allowance of 5 square feet, six hens need 30 square feet of usable indoor floor area before allowing for obstructing equipment. The floor allowance is separate from the nest interior. Two nests serve this six-hen example; observe actual use. See the primary source at the end for the complete husbandry context.
2 Read the parts and clear dimensions
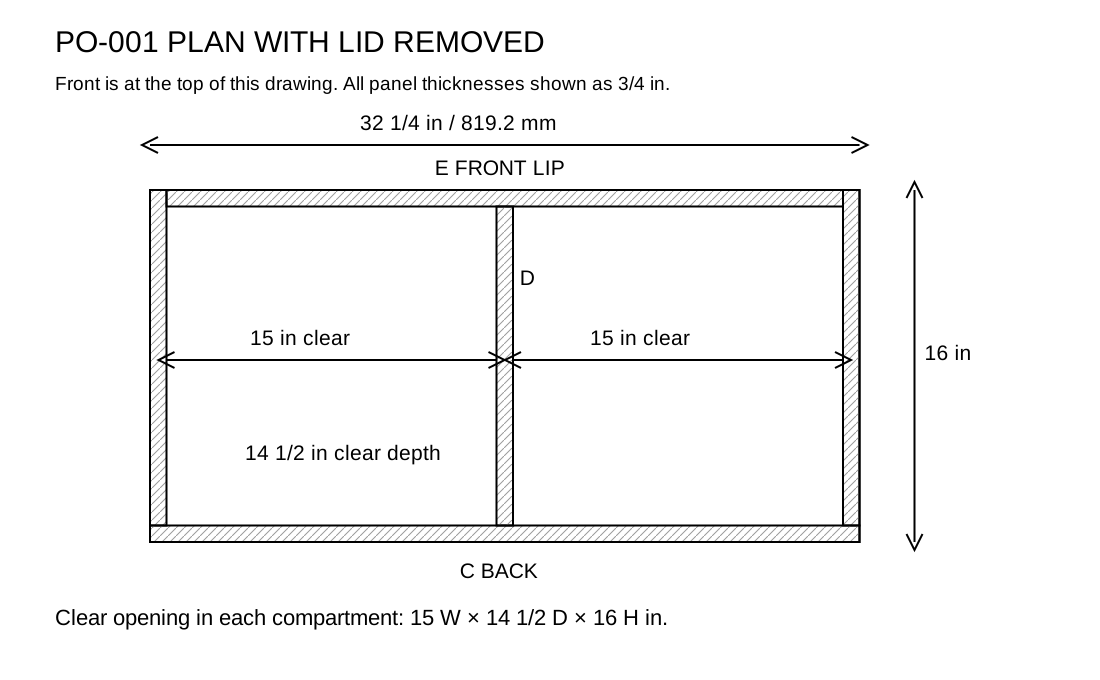
Use the front-left outside corner of floor A as the coordinate origin. X runs left to right; Y runs front to back. The left side occupies X 0–3/4 in, the right side X 31 1/2–32 1/4 in. Back C occupies Y 15 1/4–16 in. Lip E occupies Y 0–3/4 in between the sides. Divider D occupies X 15 3/4–16 1/2 in and Y 3/4–15 1/4 in. These face positions explain the butt joints; they are not centerline dimensions.
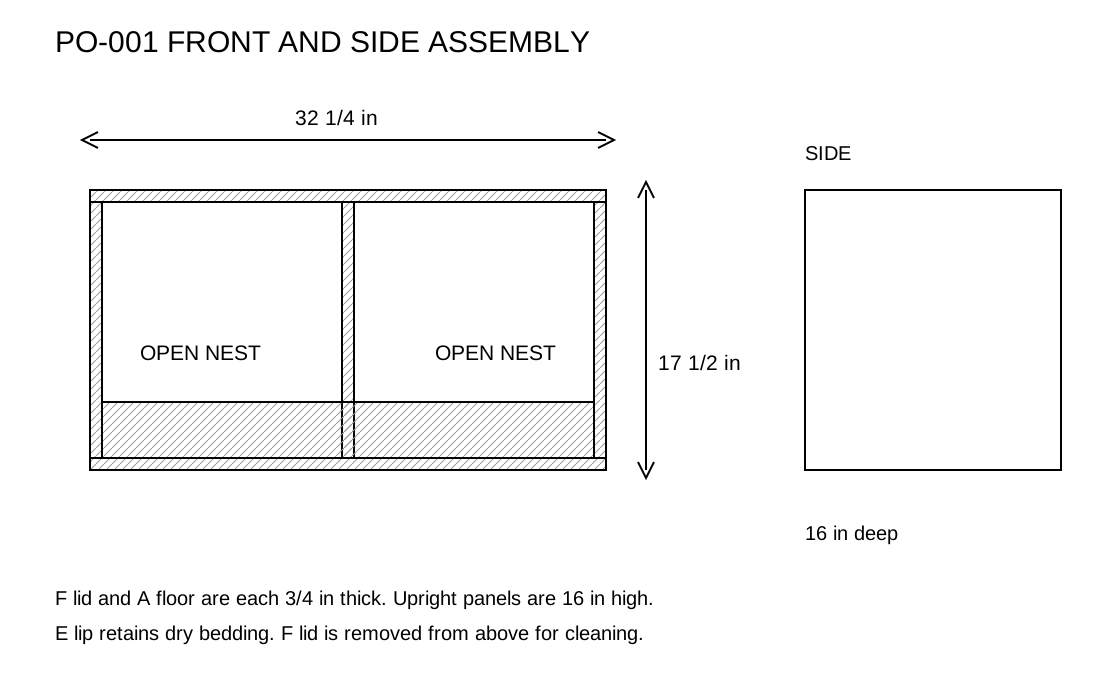
3 Select materials and make the cut list
Use a sound, flat plywood panel with clean faces and no accessible splinters or delaminated edges, suitable for the intended dry poultry interior. Do not use contaminated reclaimed wood. Select any finish for the actual use and follow its curing instructions before birds enter. This example assumes a measured thickness of exactly 3/4 in. Measure at several points; a nominal 3/4 in product can be thinner.
| ID | Part | Qty | Finished inches | Metric mm, rounded |
|---|---|---|---|---|
| A | Floor | 1 | 32 1/4 × 16 | 819.2 × 406.4 |
| B | Sides | 2 | 15 1/4 deep × 16 high | 387.4 × 406.4 |
| C | Back | 1 | 32 1/4 wide × 16 high | 819.2 × 406.4 |
| D | Divider | 1 | 14 1/2 deep × 16 high | 368.3 × 406.4 |
| E | Front bedding lip | 1 | 30 3/4 long × 3 1/2 high | 781.1 × 88.9 |
| F | Removable lid | 1 | 32 1/4 × 16 | 819.2 × 406.4 |
With a different actual thickness t, keep the outside width W = 32 1/4 in and depth L = 16 in only if you recalculate: side depth L − t; divider depth L − 2t; lip length W − 2t; divider left face (W − t)/2; each clear width (W − 3t)/2; assembled height 16 + 2t. Do not mix the numeric 3/4 in list with a different sheet thickness.
Hardware for the stated example: 33 corrosion-resistant #8 × 1 1/4 in countersunk wood screws, plus at least 6 spares. Seventeen attach the floor, seven attach the back, five attach the lip and four secure the lid. The fastener choice is for this light interior module, not a rated structural connection or wall anchor. Use a screw type suitable for plywood and test its pilot hole and countersink on an offcut of the actual material.
Tools: tape with fractional inches, reliable square, pencil, straightedge, clamps, saw and supported cutting surface, drill, driver, depth stop, bits matched to the selected screws, countersink and abrasive. Use the saw and drill with their guards, workholding and personal protection. Keep birds out of the work area.
4 Lay out a sheet and preserve the reference edges
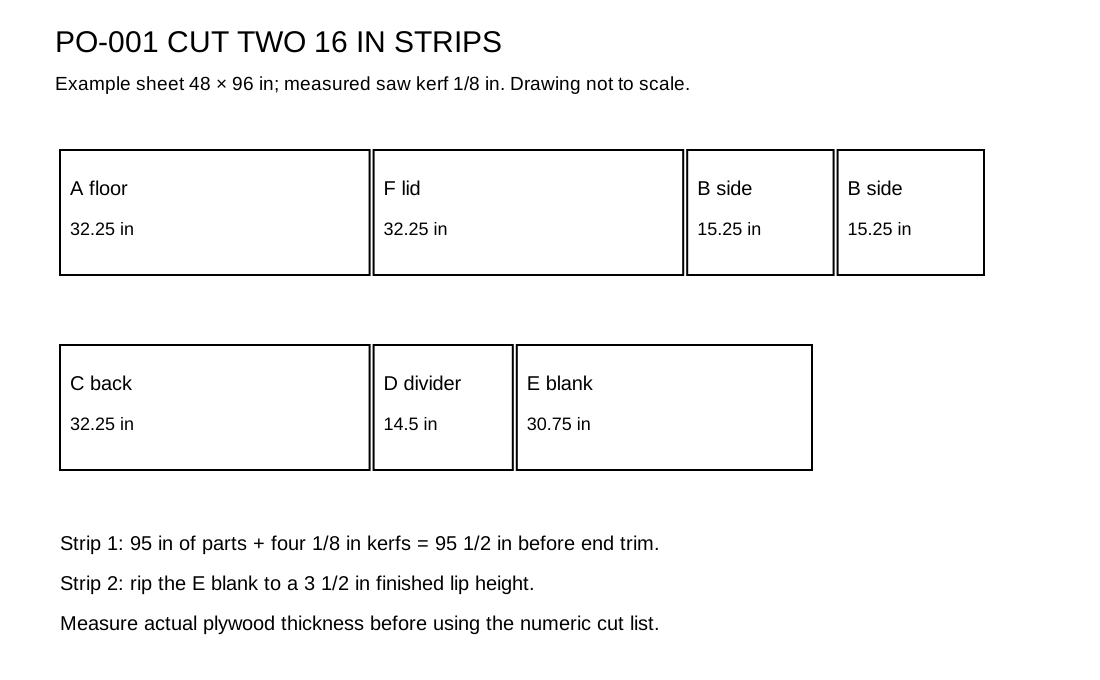
- Measure the stock. Confirm a usable 48 × 96 in sheet, measure thickness and identify a straight long edge. Measure the actual blade kerf in a trial cut. The example layout allows a 1/8 in kerf.
- Rip the first strip. Mark 16 in from the reference edge at both ends and cut on the waste side. Measure the finished strip at both ends. Do not subtract kerf from a finished part dimension.
- Rip the second strip. Mark another finished 16 in strip from the newly exposed straight edge. Two strips consume 32 in of finished width plus two saw kerfs; the remaining sheet width is not another full 16 in strip.
- Crosscut strip one. Square a reference end, then cut A 32 1/4, F 32 1/4, B 15 1/4 and B 15 1/4 in, measuring each from its own squared end. Total finished length is 95 in. Four 1/8 in kerfs bring consumption to 95 1/2 in before end trim; confirm the remaining stock can accommodate the trim.
- Crosscut strip two. Cut C 32 1/4 in, D 14 1/2 in and an E blank 30 3/4 in long. Rip the E blank to a finished 3 1/2 in height. Label the inside face of every piece before stacking it.
- Inspect the dry parts. Check opposite edges for equal length and square corners. Remove sharp splinters without changing the reference dimensions. Replace damaged parts; do not hide delamination inside a joint.
5 Mark the fastening layout
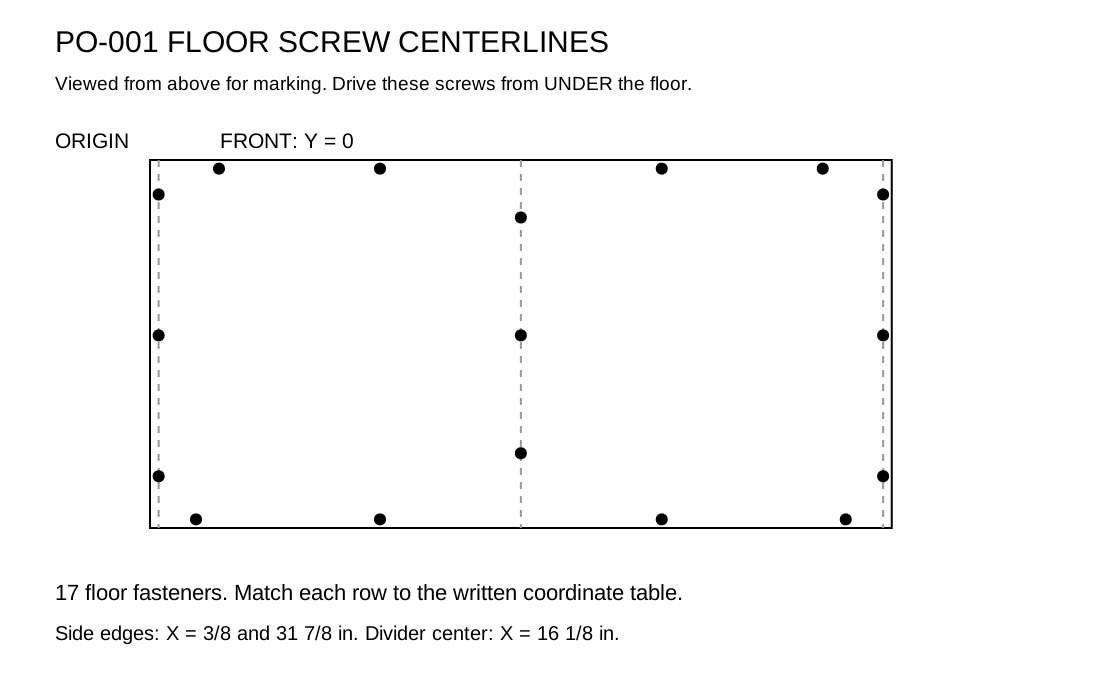
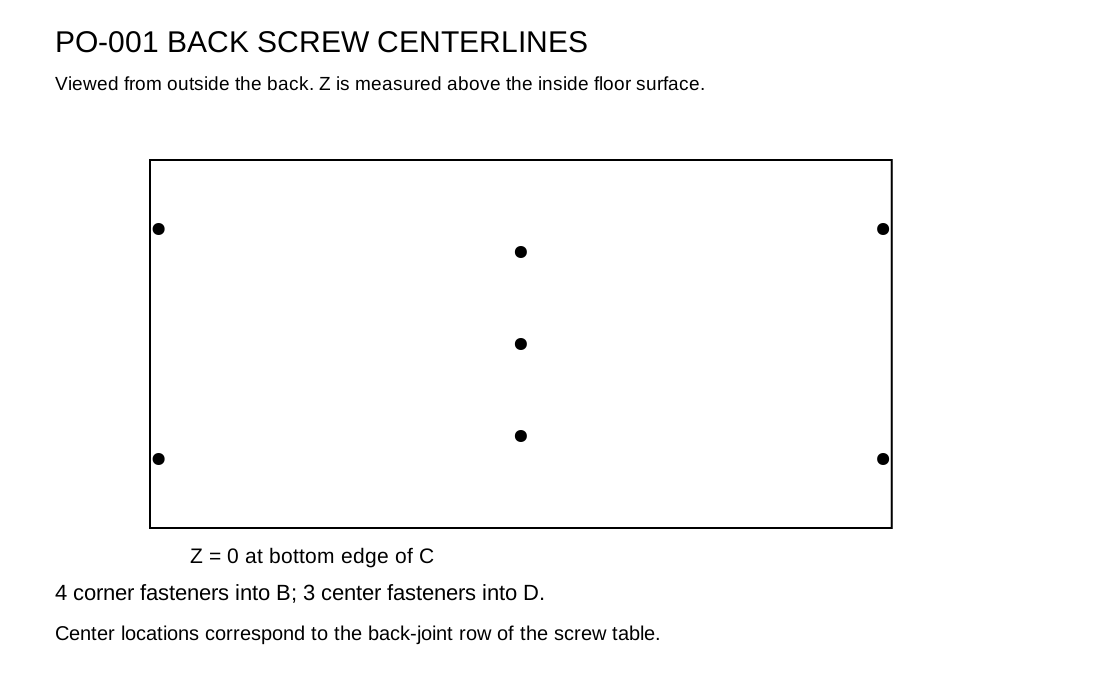
The following positions are screw centerlines in inches. X and Y are measured from the front-left outside corner of A. All floor screws enter from underneath into the centered edge of the upright part. Keep all holes perpendicular. Use a clearance hole through the face sheet and the selected screw’s pilot hole into the receiving edge; follow the fastener maker’s sizing and prove the result on scrap first.
| Joint | Centers for the 3/4 in example | Count |
|---|---|---|
| A to left/right B | X 3/8 and 31 7/8; Y 1 1/2, 7 5/8, 13 3/4 | 6 |
| A to C | Y 15 5/8; X 2, 10, 22 1/4, 30 1/4 | 4 |
| A to D | X 16 1/8; Y 2 1/2, 7 5/8, 12 3/4 | 3 |
| A to E | Y 3/8; X 3, 10, 22 1/4, 29 1/4 | 4 |
| C to B and D | Across C: X 3/8 and 31 7/8 at 3 and 13 in above the floor surface; X 16 1/8 at 4, 8 and 12 in above the floor surface | 7 |
| B and E to lip ends/divider | Through each side at Y 3/8, 1 and 2 1/2 in above floor; through E at X 16 1/8, 1 3/4 in above floor | 5 |
| F to B | X 3/8 and 31 7/8; Y 3 and 12 in | 4 |
Countersink only enough for a flush head. An overdriven screw can crush a face or split an edge. With a 1 1/4 in screw passing through a 3/4 in face, the nominal engagement is 1/2 in; verify the screw does not emerge from any face. This screw schedule is not permission to stand or sit on the lid.
6 Assemble the floor and sides
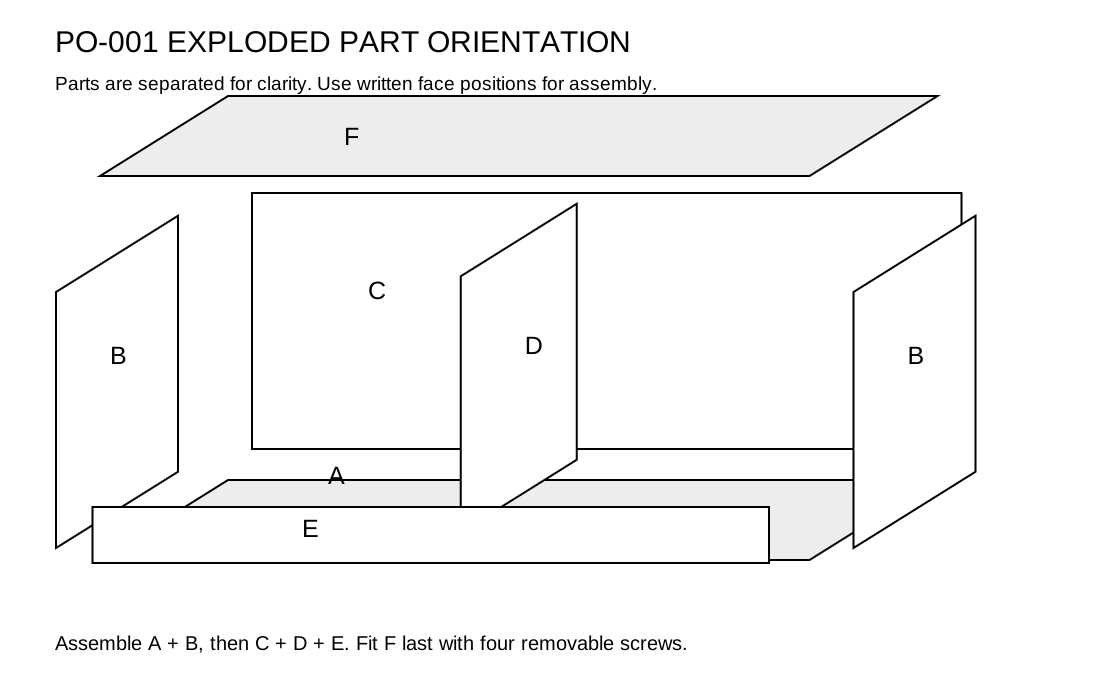
- Dry-fit the outside. Put A on a flat bench. Place both B panels on top of it with their front edges flush at Y 0 and their outside faces flush with A. Place C across the rear; C covers the rear ends of both B panels. Check the outside rectangle is 32 1/4 × 16 in.
- Trace the edges. Trace B, C, D and E positions on the top of A, using the face coordinates from section 2. Check both clear compartment widths before drilling. Transfer the screw centers to A’s underside using the same front-left reference.
- Prepare each hole. Clamp one B firmly in position. Drill the floor clearance holes and receiving-edge pilots with the depth stop. Maintain the panel square; do not use a screw to pull a tilted panel upright.
- Drive the side screws. Drive three screws through A into each B. Support the assembly safely when turning it; do not balance it on a loose upright. Seat the heads flush and check the joint for a gap or split.
- Check before continuing. Refit C and confirm it still sits flush on A and covers both rear side edges. The inner distance between B panels should be 30 3/4 in. If it differs, stop and find the incorrect face position or material thickness.
7 Fit the back divider and bedding lip
- Secure C to the floor. Clamp C at Y 15 1/4–16 in, flush with both outside side faces. Drill and drive the four A-to-C screws. Keep the top of C level with B.
- Join the rear corners. Drill through C into each side edge at the stated two heights. Drive the four rear corner screws without crushing the plywood edge. Recheck square while the clamps remain in place.
- Set D on its marks. D starts 3/4 in behind the front edge and ends against the inside face of C. Its left face is X 15 3/4 in. Check the two 15 in clear widths at front and rear. Clamp; attach D through A with three screws, then through C with three.
- Fit E between the sides. E occupies the front 3/4 in of depth and meets the front edge of D. Its bottom sits on A. Secure the four floor screws. From each side drive two screws into E’s end at the marked heights; drive the central front screw into D’s edge.
- Check the lip. Its top is 3 1/2 in above the inside floor surface. Remove accessible splinters and check all heads. The clear depth between E and C should be 14 1/2 in. Do not fill a bad joint with bedding.
8 Fit the lid and place the module
- Dry-fit F. All four outside edges finish flush with the module. F rests on B, C and D. Check that no panel stands proud and forces the lid to rock.
- Mark four removable screws. Use X 3/8 and 31 7/8 in, Y 3 and 12 in. Drill the clearance holes and receiving-edge pilots, countersink lightly and install the four screws. Mark these heads as the lid screws in the operating record.
- Verify cleaning access. Remove the same four screws and lift F away with birds excluded. You should be able to reach both nest corners, remove all bedding and inspect the inner joints. Refit the lid before use.
- Select the housing position. Place the unit in a dry, sheltered, relatively quiet part of the existing chicken house, away from droppings under roosts. Arrange the actual support, restraint and access to suit the building and users. Their structural capacity and anchors are outside this module’s screw schedule.
- Prevent inappropriate use of the top. Inspect for birds roosting on the flat lid. If needed, add a separate properly secured anti-roost canopy with no trapping gaps; do not use loose spikes, wire loops or unstable objects. The canopy is a different component project, not a detail claimed complete here.
9 Commission the nests and collect eggs
Remove all sawdust and offcuts. Confirm any finish has fully cured. Fit clean, dry nesting material and inspect the birds’ actual entry, turning and sitting space. Keep the approach clear. Monitor the birds after introducing the module and correct crowding, avoidance, wet litter or inaccessible collection before relying on it.
Keep nest checks separate from dirty coop work. Bring a dedicated clean collection container, inspect each nest and remove eggs without leaving a tool or sharp object in the bedding. Keep dirty cleaning tools away from the collection container. Record unusual breakage, soiling or laying changes and investigate the cause. Follow current official egg-handling guidance for your storage and distribution context; the nest does not establish egg shelf life.
Inspect bedding daily and replace dirty or wet material promptly. For a full clean, provide another suitable nest, exclude birds, remove F and all bedding, then clean and dry the module using products and directions appropriate for the poultry housing. Reinspect screws and plywood edges. Do not return a wet or chemically unsuitable module to use.
10 Record acceptance and the next check
| Check | Example requirement | Measured result |
|---|---|---|
| Stock thickness | Actual 3/4 in, or recalculated list | ________ |
| Outside width / depth / height | 32 1/4 / 16 / 17 1/2 in | ________ |
| Left / right clear width | 15 / 15 in at front and rear | ________ |
| Clear depth / height | 14 1/2 / 16 in before bedding | ________ |
| Squareness | Compare both outside floor diagonals; aim for no more than 1/8 in difference in this workshop example | ________ |
| Fasteners | 33 installed at scheduled joints; no exposed points, splits or projecting heads | ________ |
| Support / restraint / housing | Suitable actual support verified; dry position; no wobble, trapping gap or blocked passage | ________ |
| Cleaning access | Four lid screws identifiable; lid removable; all corners reachable | ________ |
| Observed use | Birds fit and enter normally; nests remain dry; collection reachable | ________ |
Builder/date: __________________. Material or geometry changes: __________________. Fault and correction: __________________. Next inspection date or trigger: __________________. Recheck after relocation, damage, repair or a material change.
Sources and original work
The housing context and nest allowance are based on University of Minnesota Extension, Raising chickens for eggs. Consult Penn State Extension, Small Scale Poultry Housing for additional housing context. The module’s geometry, cut layout, face coordinates, screw schedule and plates are original editorial examples, not Extension-approved plans. Metric values are rounded references; inches control the example. No physical trial, certified capacity or guaranteed laying output is claimed.