Poultry · PO-025
Portable litter-transfer chute
Direct small amounts of removed litter into a receiving cart without carrying them across the clean feed area; not a bulk gravity conveyor.
Editorial construction draft. Original digital diagrams; no physical build or load certification. Read dimensions, fit and use limits before making changes. US customary dimensions control; metric values are references.
Before marking and cutting
- Read every step and identify the installed orientation. Make the component off-site with birds excluded.
- Measure the actual receiving space, chosen commercial accessories and access route. Stop if the example does not fit; changing only one member can invalidate the assembly.
- Reject split, warped, moldy or chemically contaminated stock. Keep exposed mesh cut ends and all sharp fasteners inaccessible to birds.
- The drawing dimensions control; illustrations are not full-size templates. Allow a saw kerf between parts when laying out stock.
Use limits
- Assembly illustration shows the chute flat; installed inclination uses actual supported heights, with no roof/foundation or human-bearing use.
- No material-flow performance, load capacity or sanitation guarantee. Stop if any support, clamp or wood member moves.
Materials and cuts
| Part | Qty | Size to cut | Material |
|---|---|---|---|
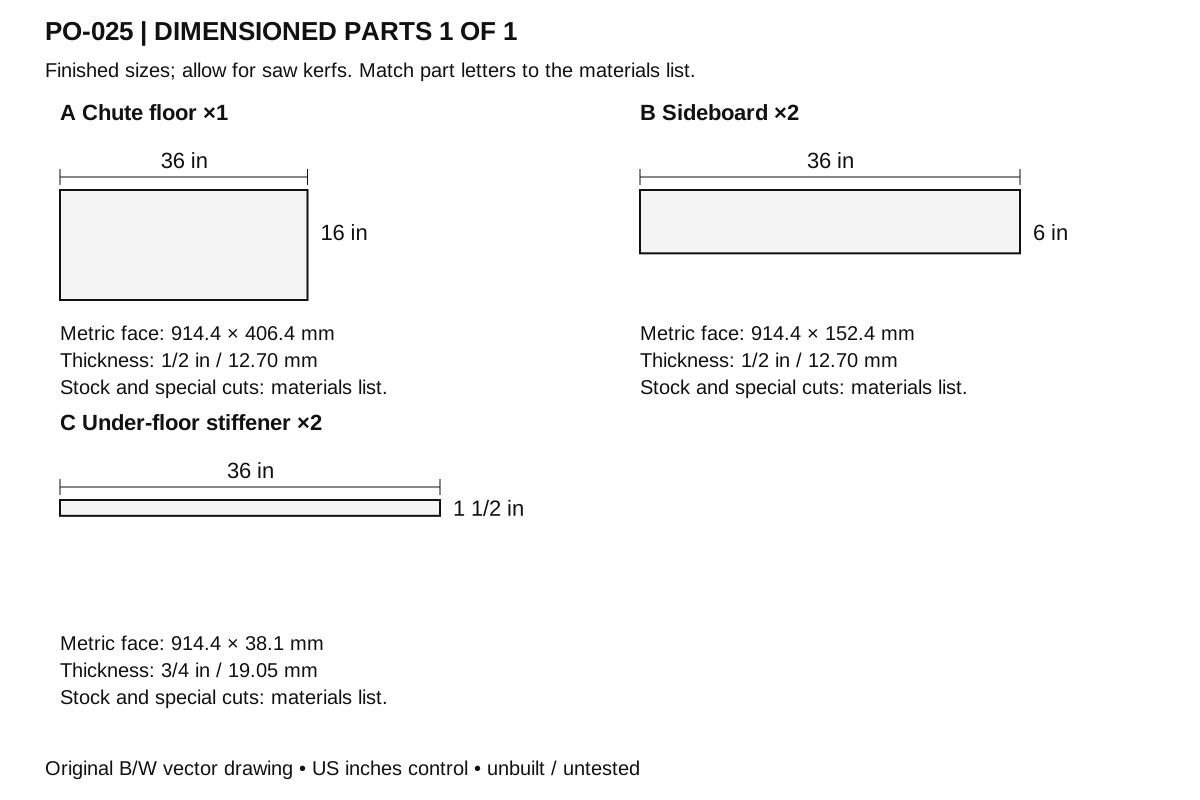
| A Chute floor | 1 | 36 × 16 × 1/2 in 914.4 × 406.4 × 12.7 mm | Exterior-bond plywood, measured actual thickness. Square ends; remove splinters. |
| B Sideboard | 2 | 36 × 6 × 1/2 in 914.4 × 152.4 × 12.7 mm | Exterior-bond plywood, measured actual thickness. Square ends; remove splinters. |
| C Under-floor stiffener | 2 | 36 × 1 1/2 × 3/4 in 914.4 × 38.1 × 19.05 mm | Untreated sound straight softwood. Square ends; remove splinters. |
Hardware and consumables
- 22 × #8 corrosion-resistant exterior wood screw 1 1/4 in (31.75 mm). Ten stiffener screws and twelve wall screws. Use compatible coatings/metals and the maker's pilot-hole guidance; do not substitute drywall screws.
- 4 × Commercial clamp with nonmarring pads. Two per end, compatible with actual rigid supports
Tools
- Tape measure, square and pencil
- Saw appropriate to material and work supports
- Drill/driver, countersink and pilot bits selected for the screws
- Clamps, sanding block and eye/hearing protection; dust control appropriate to the material
Assembly
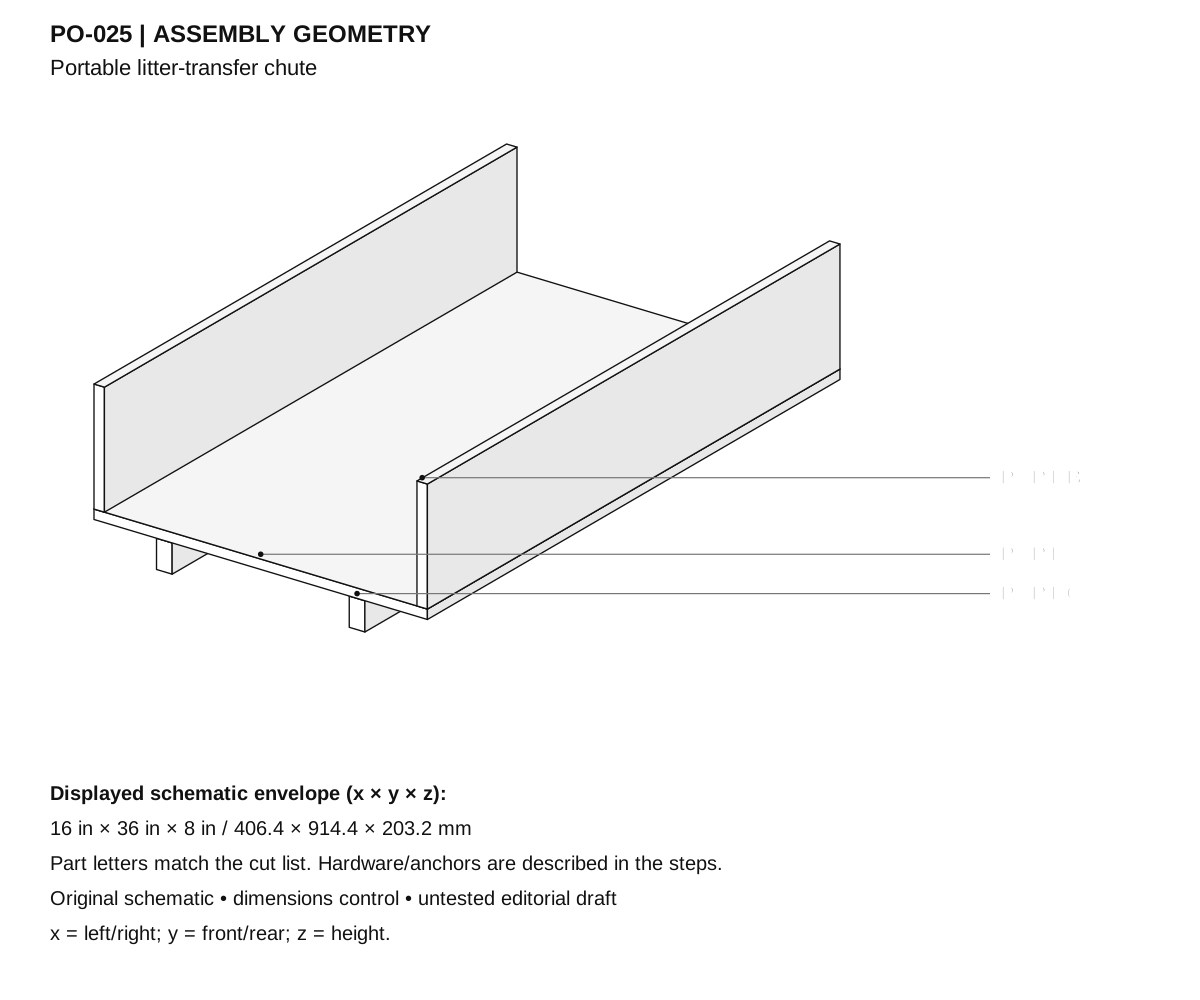
- Measure the actual receiving cart and transfer route. This example is 36 in (914.4 mm) long, with a 15 in (381 mm) clear trough; it is not a bridge to walk on.
- Cut A to 36 × 16 in, B to 36 × 6 in and C stiffeners to 36 in long with actual 3/4 × 1 1/2 in cross-sections.
- Lay C on their 3/4 in edges with left faces at x = 3 and 12 1/4 in (76.2 and 311.2 mm). Place A flat across them.
- Mark five fastening points above each C at y = 2, 10, 18, 26 and 34 in. Pilot and attach A with ten 1 1/4 in screws downward into C.
- Stand B on A at the full-length outer sides, leaving 15 in clear between. Clamp one side at a time.
- Mark a centered wall screw line 1/4 in (6.4 mm) from each A edge. Attach upward through A with six 1 1/4 in screws per B, equally spaced from y = 2 to 34 in.
- Sand the exposed lower/upper ends and cover no edge with loose tape or fraying material. Seal/cure plywood edges appropriately before use.
- Set the upper and lower ends on existing rigid supports spanning the full width. For this example, limit the height difference to 12 in over the 36 in length; actual material may need manual movement even at this slope.
- Use two commercial clamps at each support to retain the chute without crushing plywood. Keep clamp handles outside the travel and hand paths; do not rely on the chute's weight.
- With no birds present, test the empty assembly and then a small handful of removed bedding. Stop if material hangs up, the receiving cart shifts, or supports/clamps move.
- Guide material with a dedicated hand tool from the upper end; keep hands away from the receiving gap. Never reach underneath or use the chute for wet heavy manure loads.
- Unclamp only when empty, remove organic matter into waste collection, wash as appropriate and dry both stiffeners and trough before storage outside the clean-equipment area.
Checks
- Two stiffeners are mounted edge-up, 1 1/2 in deep; all ten screws remain in them.
- Clear trough is 15 in; sideboards stand 6 in above the 1/2 in floor.
- Both full-width supports and all four clamps are stable; receiving cart cannot roll away.
- No person or heavy bulk load; birds excluded and no mixing of waste/clean-feed routes.
Cleaning and maintenance
- Inspect before each use for splits, loose joints, protruding points and trapped debris.
- Remove accumulated litter or manure promptly. When cleaning is needed, move birds away, remove debris first, wash and use only a suitable label-directed product if disinfection is indicated; let the item dry before return.
- Recheck the fit after seasonal wood movement. Replace cracked panels, rusted fasteners or frayed liners instead of concealing damage.
- Sand accessible edges to a small smooth radius. Use a removable washable contact liner where specified. Any optional coating must be suitable for the intended animal-equipment use and fully cured according to its label before installation. Porous wood is not represented as a disinfectable food-contact surface.
Primary context
These sources inform the context and do not endorse the original construction design.