Poultry · PO-034
Hinged personnel gate for an existing poultry run
Provide a narrow manually operated service gate with a diagonally gusseted leaf and a defined two-sided latch interface.
Editorial construction draft. Original digital diagrams; no physical build or load certification. Read dimensions, fit and use limits before making changes. US customary dimensions control; metric values are references.
Before marking and cutting
- Read every step and identify the installed orientation. Make the component off-site with birds excluded.
- Measure the actual receiving space, chosen commercial accessories and access route. Stop if the example does not fit; changing only one member can invalidate the assembly.
- Reject split, warped, moldy or chemically contaminated stock. Keep exposed mesh cut ends and all sharp fasteners inaccessible to birds.
- The drawing dimensions control; illustrations are not full-size templates. Allow a saw kerf between parts when laying out stock.
Use limits
- No person may stand or sit on this component. No tested load rating is claimed.
- A site-specific safe location and supervision are required; remove it if birds become trapped, peck damaged material, or cannot use their normal feed, water, shelter and escape routes.
Materials and cuts
| Part | Qty | Size to cut | Material |
|---|---|---|---|
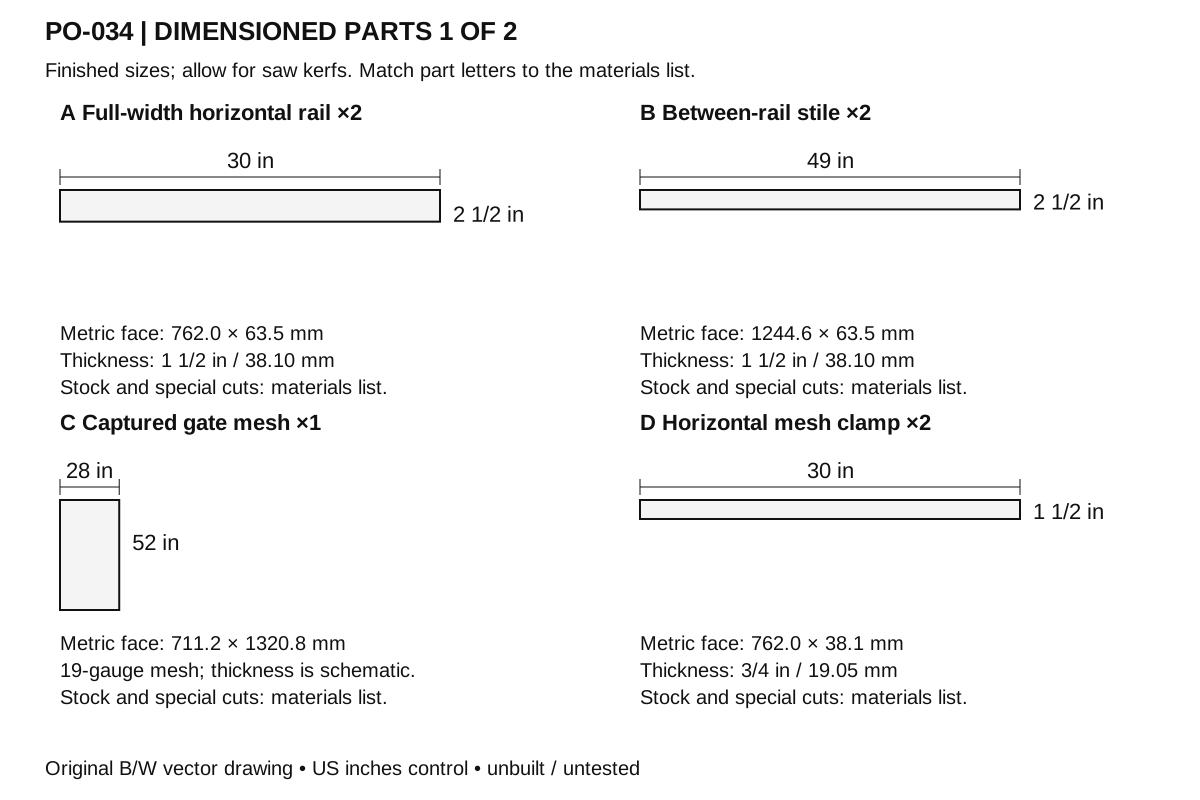
| A Full-width horizontal rail | 2 | 30 × 2 1/2 × 1 1/2 in 762 × 63.5 × 38.1 mm | Untreated sound straight softwood. Square ends; remove splinters. |
| B Between-rail stile | 2 | 49 × 2 1/2 × 1 1/2 in 1244.6 × 63.5 × 38.1 mm | Untreated sound straight softwood. Square ends; remove splinters. |
| C Captured gate mesh | 1 | 28 × 52 × 1/25 in 711.2 × 1320.8 × 1.02 mm | Welded galvanized 1/2 in hardware cloth, 19-gauge product. Capture all cut ends under wooden battens. Schematic thickness is not a supplier measurement. |
| D Horizontal mesh clamp | 2 | 30 × 1 1/2 × 3/4 in 762 × 38.1 × 19.05 mm | Untreated sound straight softwood. Square ends; remove splinters. |
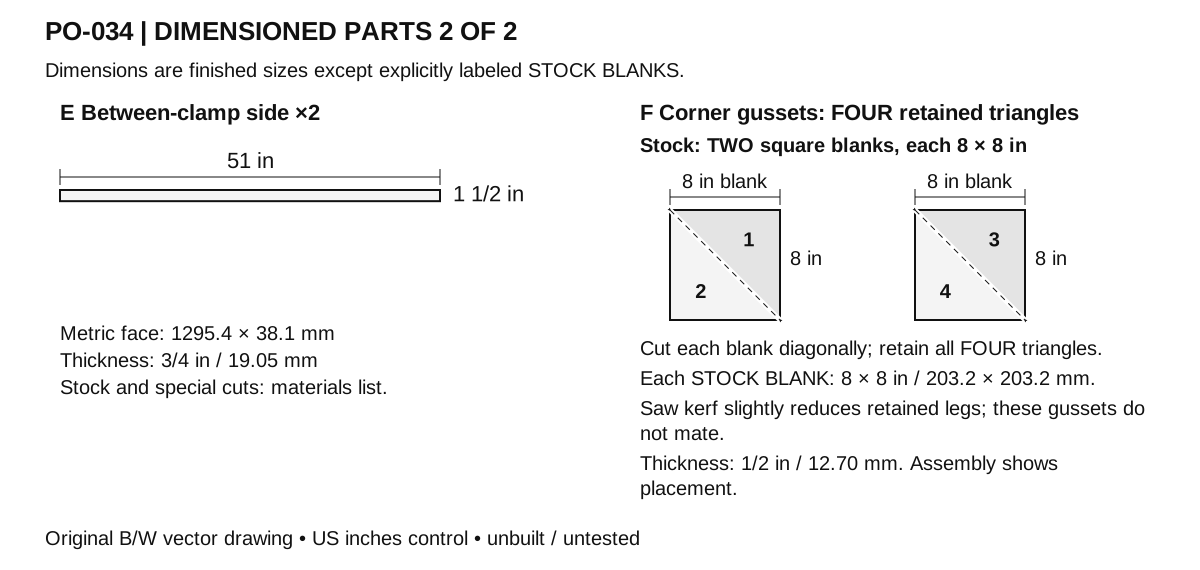
| E Between-clamp side | 2 | 51 × 1 1/2 × 3/4 in 1295.4 × 38.1 × 19.05 mm | Untreated sound straight softwood. Square ends; remove splinters. |
| F Corner gusset | 4 | 8 × 8 × 1/2 in 203.2 × 203.2 × 12.7 mm | Exterior-bond plywood, measured actual thickness. Finished count: FOUR non-mating right-triangle gussets. Cut TWO 8 × 8 in square stock blanks diagonally; retain both halves. The 8 in dimensions describe blank edges before cutting; saw kerf slightly reduces finished legs. |
Hardware and consumables
- 8 × #10 corrosion-resistant exterior wood screw 3 1/2 in (88.9 mm). Frame corner joints [N1]
- 24 × #8 corrosion-resistant exterior wood screw 1 1/2 in (38.1 mm). Gussets [N1]
- 28 × #8 corrosion-resistant exterior wood screw 1 1/2 in (38.1 mm). Mesh clamps [N1]
- 2 × 3 × 3 in corrosion-resistant surface butt hinge, six holes. Three gate and three post screws per hinge; surface fit, clear of gussets
- 12 × #10 corrosion-resistant exterior wood screw 1 1/4 in (31.75 mm). Hinges, six per hinge [N1]
- 1 × Nationwide Industries NW6185 Wood Gate Latch with Handle, complete actual hardware kit. Use the exact model interface and current supplied instructions; no substituted cord-operated latch
- N1 applies to every entry marked [N1]: Use compatible coatings/metals and the maker's pilot-hole guidance; do not substitute drywall screws.
Tools
- Tape measure, square and pencil
- Saw appropriate to material and work supports
- Drill/driver, countersink and pilot bits selected for the screws
- Clamps, sanding block and eye/hearing protection; dust control appropriate to the material
Assembly
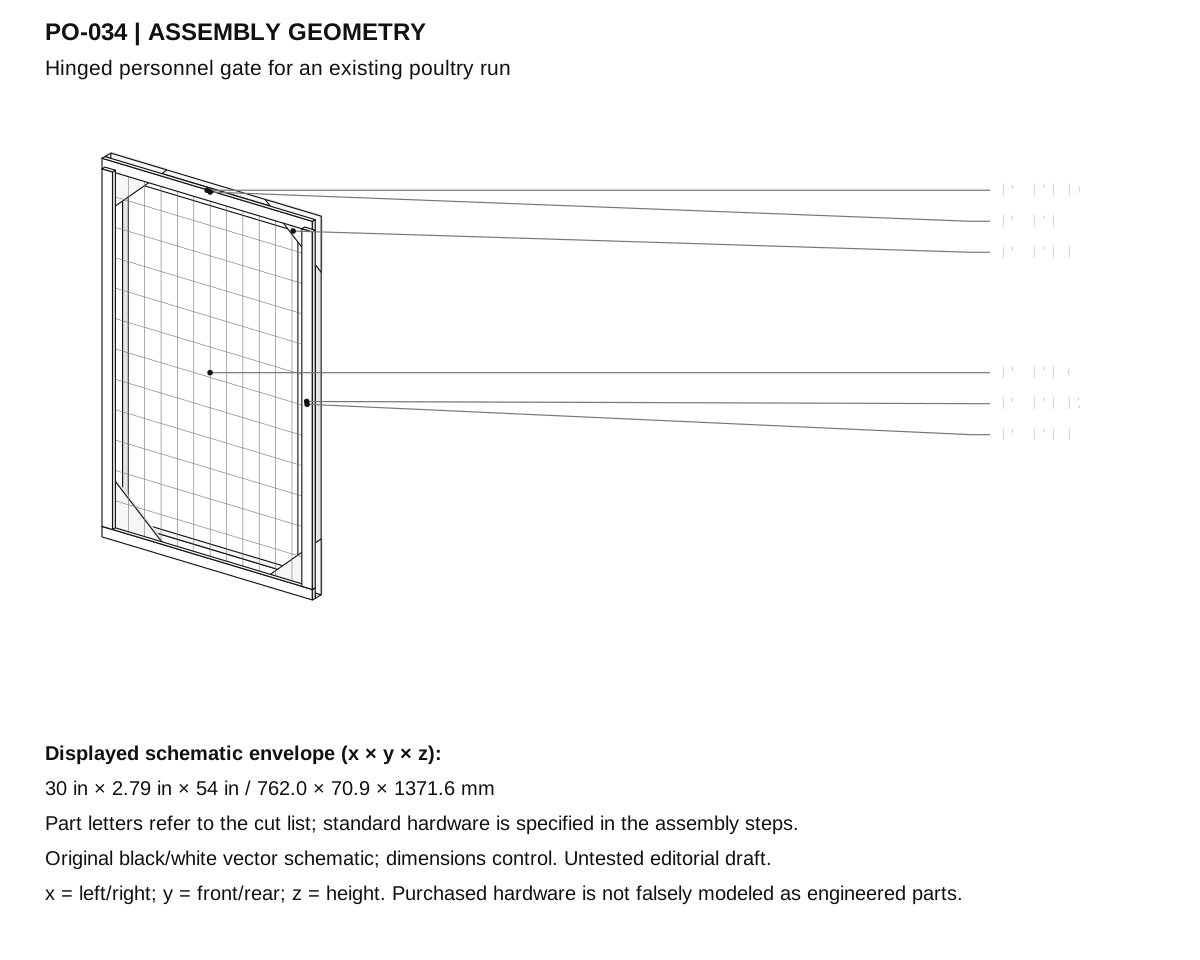
- Verify sound existing posts have 30 3/4 in (781.1 mm) clear width. This project supplies the leaf, not post foundations, a wind design or a predator-certified boundary.
- Cut two A rails 30 in long and two B stiles 49 in long from actual 1 1/2 × 2 1/2 in stock. Lay B between A to make a 30 × 54 in leaf.
- Clamp square and drive two #10 × 3 1/2 in screws through each rail into each stile end, eight total. Keep holes centered in the stile ends and stagger them across the 1 1/2 in depth.
- Cut FOUR F non-mating triangular gussets from TWO 8 × 8 in square plywood blanks, cutting each blank diagonally and retaining both halves. Fit one at each rear corner. The 8 in dimensions describe blank edges before cutting; saw kerf slightly reduces finished legs.
- Attach each gusset using six 1 1/2 in screws, three per frame leg, with the closest hole 1 in from the outer corner and the others 3 and 6 in away. All heads remain flush.
- Cut C mesh 28 × 52 in and center it on the front, 1 in from every leaf edge. Cover every cut wire with D/E clamps.
- Fasten each D with six 1 1/2 in screws and each E with eight, on the frame/clamp centerline. The wood leaf plus clamp is 2 1/4 in thick, with the thin mesh stack additional.
- Fit two 3 × 3 in six-hole surface butt hinges on the rear hinge stile at 12 and 42 in above the leaf bottom, clear of gussets. Use six #10 × 1 1/4 in screws per hinge.
- Support the leaf on solid temporary blocks 2 in above grade. Center it between posts with 3/8 in (9.5 mm) clearance at both sides, then fix hinge post leaves with the remaining supplied/specification-matched screws.
- Use the specified Nationwide NW6185 manual wood gate latch. Confirm the actual 2.25–2.75 in thickness window, 3/8 in gap and minimum 2 in engagement before drilling; use its actual handle as the template and its supplied hardware.
- Follow the NW6185 orientation and 3/8 in through-hole instructions. Test release from both sides with a second adult present; do not add a pull cord, padlock or inaccessible closure.
- Remove setup blocks and cycle twenty times. Confirm ground clearance, smooth two-sided operation and no sharp mesh. This example is not a child-containment or universal predator-proof gate.
Checks
- Leaf diagonals agree before gussets; outside size 30 × 54 in.
- Actual latch zone thickness, gap and engagement meet the specified hardware instructions.
- Two-side operation is checked without a person being confined; no dangling cord or sharp point.
- Existing posts remain sound and fixed; inspect after weather and stop if the leaf sags or binds.
Cleaning and maintenance
- Inspect before each use for splits, loose joints, protruding points and trapped debris.
- Remove accumulated litter or manure promptly. When cleaning is needed, move birds away, remove debris first, wash and use only a suitable label-directed product if disinfection is indicated; let the item dry before return.
- Recheck the fit after seasonal wood movement. Replace cracked panels, rusted fasteners or frayed liners instead of concealing damage.
- Sand accessible edges to a small smooth radius. Use a removable washable contact liner where specified. Any optional coating must be suitable for the intended animal-equipment use and fully cured according to its label before installation. Porous wood is not represented as a disinfectable food-contact surface.
Primary context
These sources inform the context and do not endorse the original construction design.