Poultry · PO-035
Bolted washable dry-feed trough
Present balanced dry feed in an open, removable HDPE trough on a broad timber base; no gravity-flow or flock-capacity promise.
Editorial construction draft. Original digital diagrams; no physical build or load certification. Read dimensions, fit and use limits before making changes. US customary dimensions control; metric values are references.
Before marking and cutting
- Read every step and identify the installed orientation. Make the component off-site with birds excluded.
- Measure the actual receiving space, chosen commercial accessories and access route. Stop if the example does not fit; changing only one member can invalidate the assembly.
- Reject split, warped, moldy or chemically contaminated stock. Keep exposed mesh cut ends and all sharp fasteners inaccessible to birds.
- The drawing dimensions control; illustrations are not full-size templates. Allow a saw kerf between parts when laying out stock.
Use limits
- No person may stand or sit on this component. No tested load rating is claimed.
- A site-specific safe location and supervision are required; remove it if birds become trapped, peck damaged material, or cannot use their normal feed, water, shelter and escape routes.
Materials and cuts
| Part | Qty | Size to cut | Material |
|---|---|---|---|
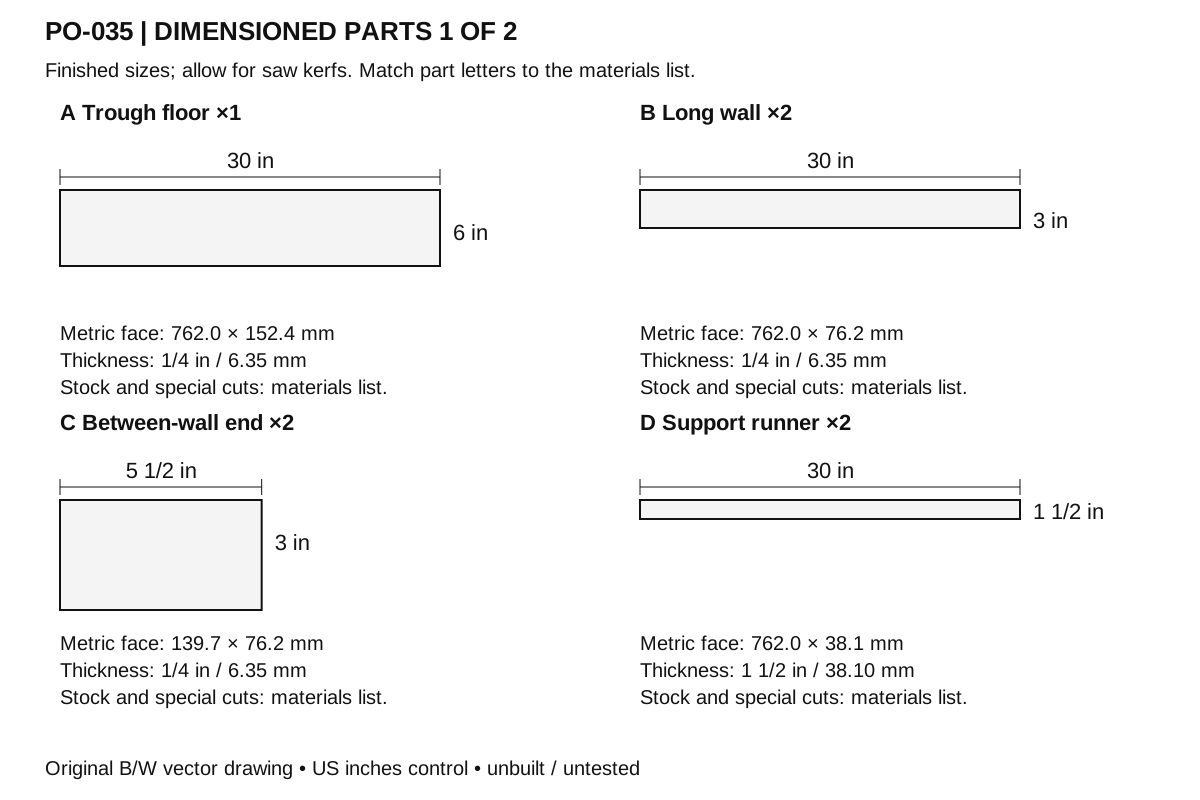
| A Trough floor | 1 | 30 × 6 × 1/4 in 762 × 152.4 × 6.35 mm | Virgin food/feed-contact HDPE sheet, actual 1/4 in. Square ends; remove splinters. |
| B Long wall | 2 | 30 × 3 × 1/4 in 762 × 76.2 × 6.35 mm | Same specified HDPE sheet. Square ends; remove splinters. |
| C Between-wall end | 2 | 5 1/2 × 3 × 1/4 in 139.7 × 76.2 × 6.35 mm | Same specified HDPE sheet. Square ends; remove splinters. |
| D Support runner | 2 | 30 × 1 1/2 × 1 1/2 in 762 × 38.1 × 38.1 mm | Untreated sound straight softwood. Square ends; remove splinters. |
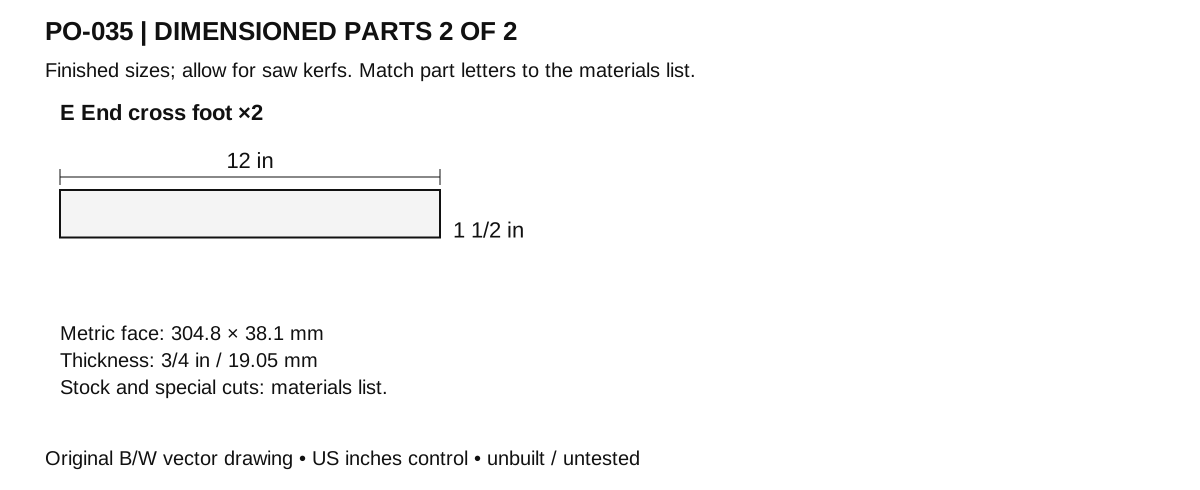
| E End cross foot | 2 | 12 × 1 1/2 × 3/4 in 304.8 × 38.1 × 19.05 mm | Untreated sound straight softwood. Square ends; remove splinters. |
Hardware and consumables
- 14 × Stainless 1 × 1 in two-hole 90-degree angle. Eight wall-corner and six wall-to-floor angles, one hole per leg
- 28 × #6-32 × 3/4 in stainless smooth-head machine screw. One per angle hole; use washers and acorn nuts with verified engagement
- 28 × #6-32 washer and locking nut and smooth end cap set. No thread end in the feed space
- 4 × 0.138 in diameter × 2 1/4 in corrosion-resistant through-bolt 2 1/4 in (57.15 mm). Floor to support runners; #6-32 equivalent diameter, smooth heads inside. Use two suitable washers and a locking nut per bolt unless specified; cap or trim exposed threads after verifying full nut engagement.
- 8 × #8 corrosion-resistant exterior wood screw 1 3/4 in (44.45 mm). Cross feet to runners. Use compatible coatings/metals and the maker's pilot-hole guidance; do not substitute drywall screws.
Tools
- Tape measure, square and pencil
- Saw appropriate to material and work supports
- Drill/driver, countersink and pilot bits selected for the screws
- Clamps, sanding block and eye/hearing protection; dust control appropriate to the material
Assembly
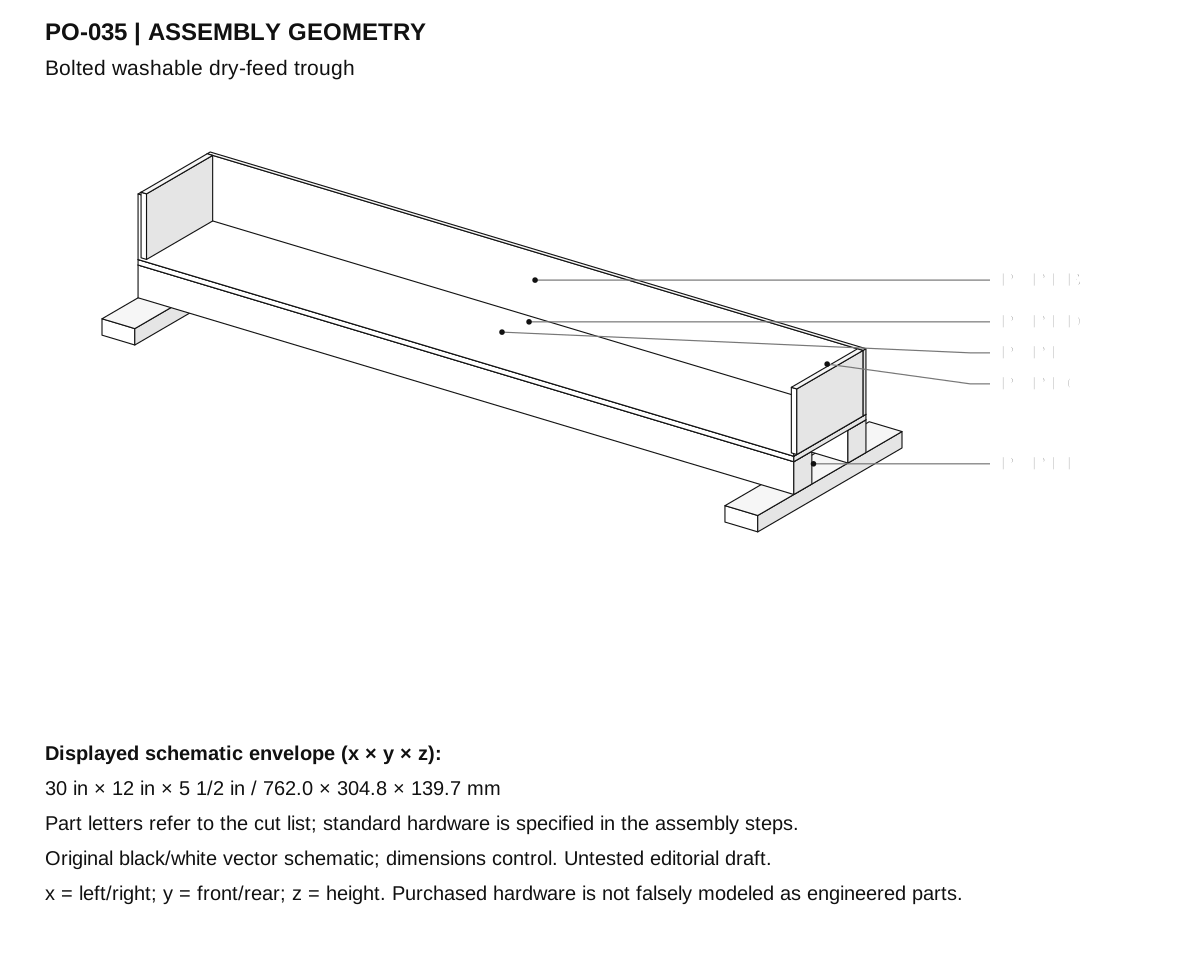
- Confirm the actual adult birds can reach a trough rim about 5 1/2 in (139.7 mm) above the floor with this base. It is not a chick feeder or a complete ration design.
- Cut A 30 × 6 in, B 30 × 3 in and C 5 1/2 × 3 in from actual 1/4 in food/feed-contact HDPE. Deburr all edges without heating the plastic.
- Stand B on A at its long outer edges, then fit C between B at the ends. Clear inside footprint is 29 1/2 × 5 1/2 in.
- Clamp the dry assembly square. Fit small 1 × 1 in stainless 90-degree angles at the four inside corners, two per corner at different heights; all inside hardware must be smooth and accessible for washing.
- Drill the actual angle holes through HDPE with a 5/32 in clearance bit for #6-32 bolts. Use short 3/4 in machine screws, broad washers and locking nuts and smooth end caps; avoid sharp thread ends.
- Attach walls to the floor using six additional stainless angles: two per long wall at x = 10 and 20 in, one per end at the center. Use the same bolted fastening method; no adhesive or solvent weld is assumed.
- Cut two D runners 30 in long from actual 1 1/2 in square stock and E cross feet 12 in long from actual 3/4 × 1 1/2 in stock.
- Place D 6 in outside-to-outside. Fasten E beneath them at the two ends, centered front/rear so each projects 3 in beyond the trough. Use two 1 3/4 in wood screws at every E/D crossing, eight total.
- Set the empty trough on D. Add four #6-32 × 2 1/4 in vertical retention bolts through floor and runners, two per runner at x = 6 and 24 in; use smooth heads inside and washers/locking nuts below.
- Take the trough off once to confirm it is removable. Check each nut is captured and no loose washer can fall into feed; tighten only enough to seat HDPE without cracking it. Orient smooth bolt heads toward the feed space; keep nuts outside, trim only after full locking-nut engagement and fit secure smooth caps.
- Place on a level sheltered floor and add a shallow amount of appropriate complete dry feed. Observe access, fouling and spillage; remove if the birds stand inside, cannot reach feed or damage a joint.
- Empty and disassemble as needed for thorough cleaning and complete drying. It is not liquid-tight, rodent-proof, weatherproof or suitable for wet mash stored between feedings.
Checks
- HDPE walls stand on A; internal plan is 29 1/2 × 5 1/2 in and internal depth 3 in.
- All angle bolts are short, smooth-ended and accessible; no adhesive joint is relied upon.
- Cross feet create a 12 in spread; actual trough can be removed from its four retention bolts.
- Observe actual adult-bird use, with no universal feeder-space, leakproof or payload claim.
Cleaning and maintenance
- Inspect before each use for splits, loose joints, protruding points and trapped debris.
- Remove accumulated litter or manure promptly. When cleaning is needed, move birds away, remove debris first, wash and use only a suitable label-directed product if disinfection is indicated; let the item dry before return.
- Recheck the fit after seasonal wood movement. Replace cracked panels, rusted fasteners or frayed liners instead of concealing damage.
- Sand accessible edges to a small smooth radius. Use a removable washable contact liner where specified. Any optional coating must be suitable for the intended animal-equipment use and fully cured according to its label before installation. Porous wood is not represented as a disinfectable food-contact surface.
Primary context
These sources inform the context and do not endorse the original construction design.