Poultry · PO-036
Dedicated clean egg-packing workbench
Provide a fixed clean work surface and a low empty-carton shelf, separate from manure and wash tools.
Editorial construction draft. Original digital diagrams; no physical build or load certification. Read dimensions, fit and use limits before making changes. US customary dimensions control; metric values are references.
Before marking and cutting
- Read every step and identify the installed orientation. Make the component off-site with birds excluded.
- Measure the actual receiving space, chosen commercial accessories and access route. Stop if the example does not fit; changing only one member can invalidate the assembly.
- Reject split, warped, moldy or chemically contaminated stock. Keep exposed mesh cut ends and all sharp fasteners inaccessible to birds.
- The drawing dimensions control; illustrations are not full-size templates. Allow a saw kerf between parts when laying out stock.
Use limits
- No person may stand or sit on this component. No tested load rating is claimed.
- A site-specific safe location and supervision are required; remove it if birds become trapped, peck damaged material, or cannot use their normal feed, water, shelter and escape routes.
Materials and cuts
| Part | Qty | Size to cut | Material |
|---|---|---|---|
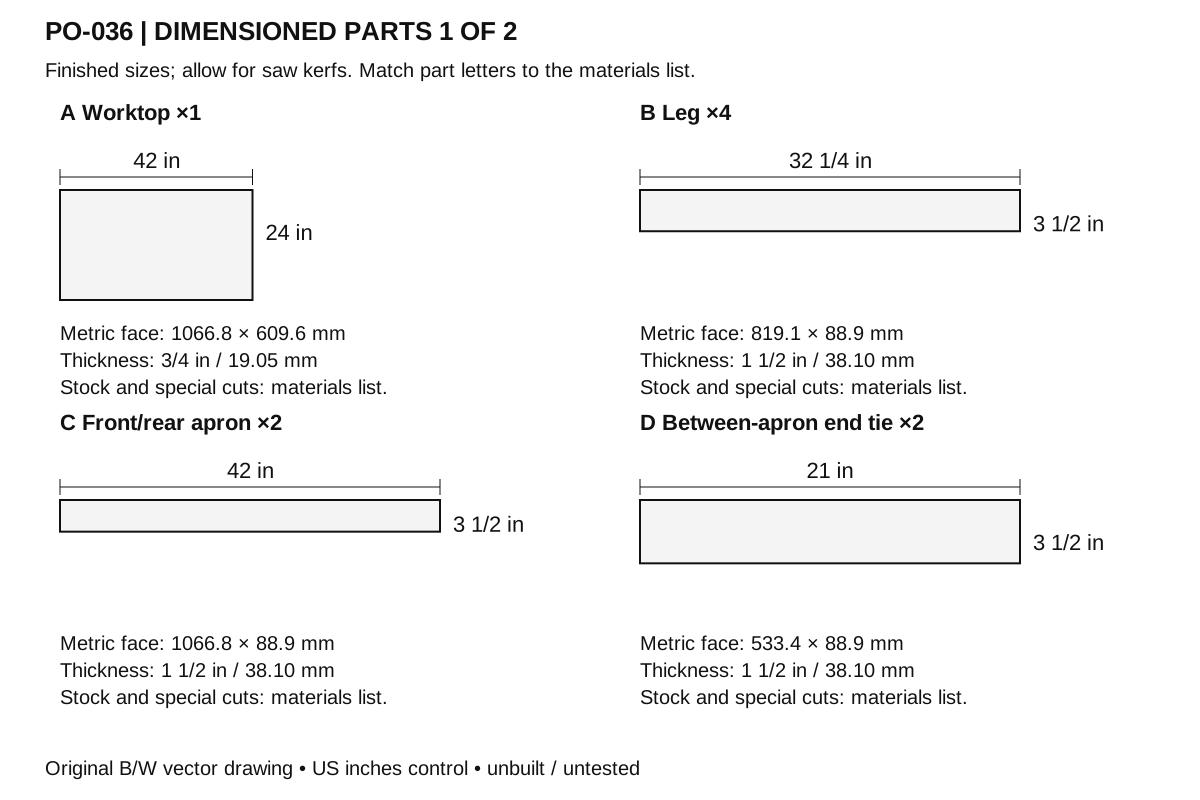
| A Worktop | 1 | 42 × 24 × 3/4 in 1066.8 × 609.6 × 19.05 mm | Exterior-bond plywood, measured actual thickness. Square ends; remove splinters. |
| B Leg | 4 | 32 1/4 × 3 1/2 × 1 1/2 in 819.15 × 88.9 × 38.1 mm | Untreated sound straight softwood. Square ends; remove splinters. |
| C Front/rear apron | 2 | 42 × 3 1/2 × 1 1/2 in 1066.8 × 88.9 × 38.1 mm | Untreated sound straight softwood. Square ends; remove splinters. |
| D Between-apron end tie | 2 | 21 × 3 1/2 × 1 1/2 in 533.4 × 88.9 × 38.1 mm | Untreated sound straight softwood. Square ends; remove splinters. |
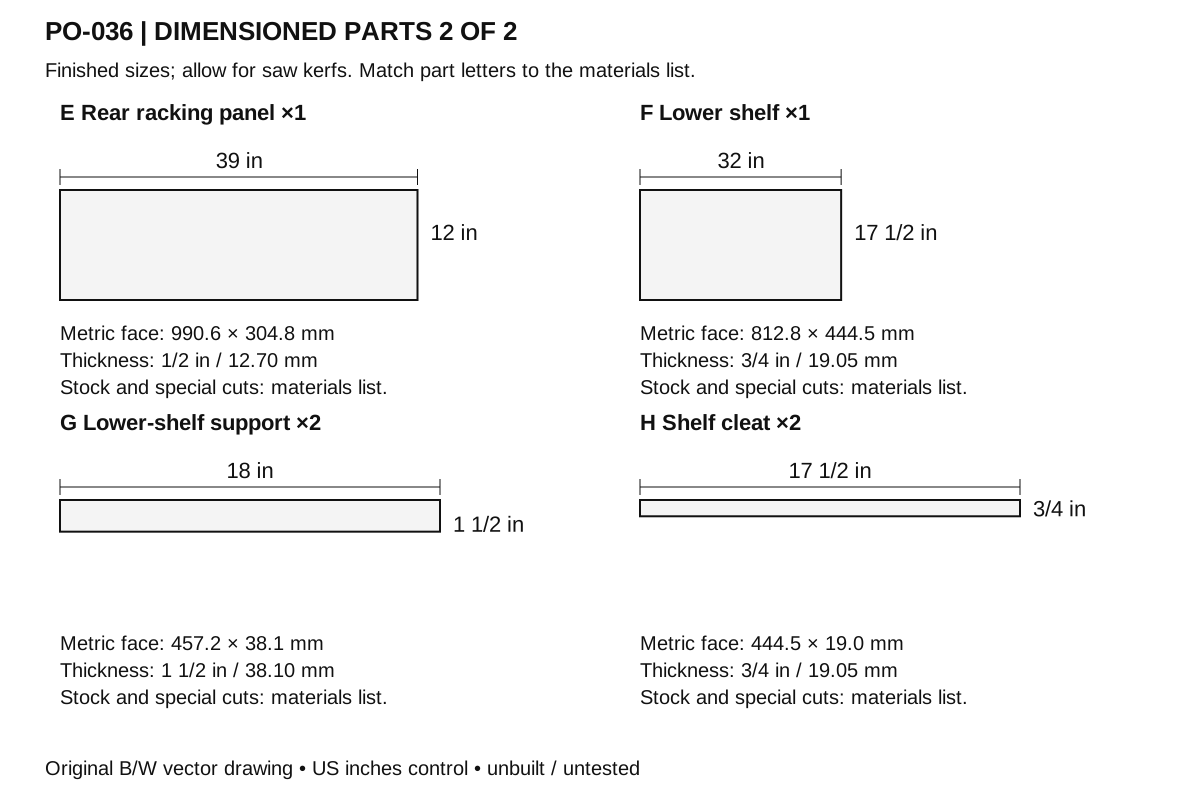
| E Rear racking panel | 1 | 39 × 12 × 1/2 in 990.6 × 304.8 × 12.7 mm | Exterior-bond plywood, measured actual thickness. Square ends; remove splinters. |
| F Lower shelf | 1 | 32 × 17 1/2 × 3/4 in 812.8 × 444.5 × 19.05 mm | Exterior-bond plywood, measured actual thickness. Square ends; remove splinters. |
| G Lower-shelf support | 2 | 18 × 1 1/2 × 1 1/2 in 457.2 × 38.1 × 38.1 mm | Untreated sound straight softwood. Square ends; remove splinters. |
| H Shelf cleat | 2 | 17 1/2 × 3/4 × 3/4 in 444.5 × 19.05 × 19.05 mm | Untreated sound straight softwood. Square ends; remove splinters. |
Hardware and consumables
- 8 × #10 exterior wood screw 3 in (76.2 mm). Apron ring [N1]
- 8 × 1/4 in diameter × 4 in corrosion-resistant through-bolt 4 in (101.6 mm). Legs to aprons. Use two suitable washers and a locking nut per bolt unless specified; cap or trim exposed threads after verifying full nut engagement.
- 8 × #10 exterior wood screw 3 in (76.2 mm). G supports to legs [N1]
- 6 × #8 corrosion-resistant exterior wood screw 1 1/4 in (31.75 mm). Shelf to additional cleats [N1]
- 8 × #8 corrosion-resistant exterior wood screw 1 1/4 in (31.75 mm). Racking panel [N1]
- 8 × #8 corrosion-resistant exterior wood screw 1 1/4 in (31.75 mm). H shelf cleats [N1]
- 12 × #8 corrosion-resistant exterior wood screw 1 3/4 in (44.45 mm). Top [N1]
- N1 applies to every entry marked [N1]: Use compatible coatings/metals and the maker's pilot-hole guidance; do not substitute drywall screws.
Tools
- Tape measure, square and pencil
- Saw appropriate to material and work supports
- Drill/driver, countersink and pilot bits selected for the screws
- Clamps, sanding block and eye/hearing protection; dust control appropriate to the material
Assembly
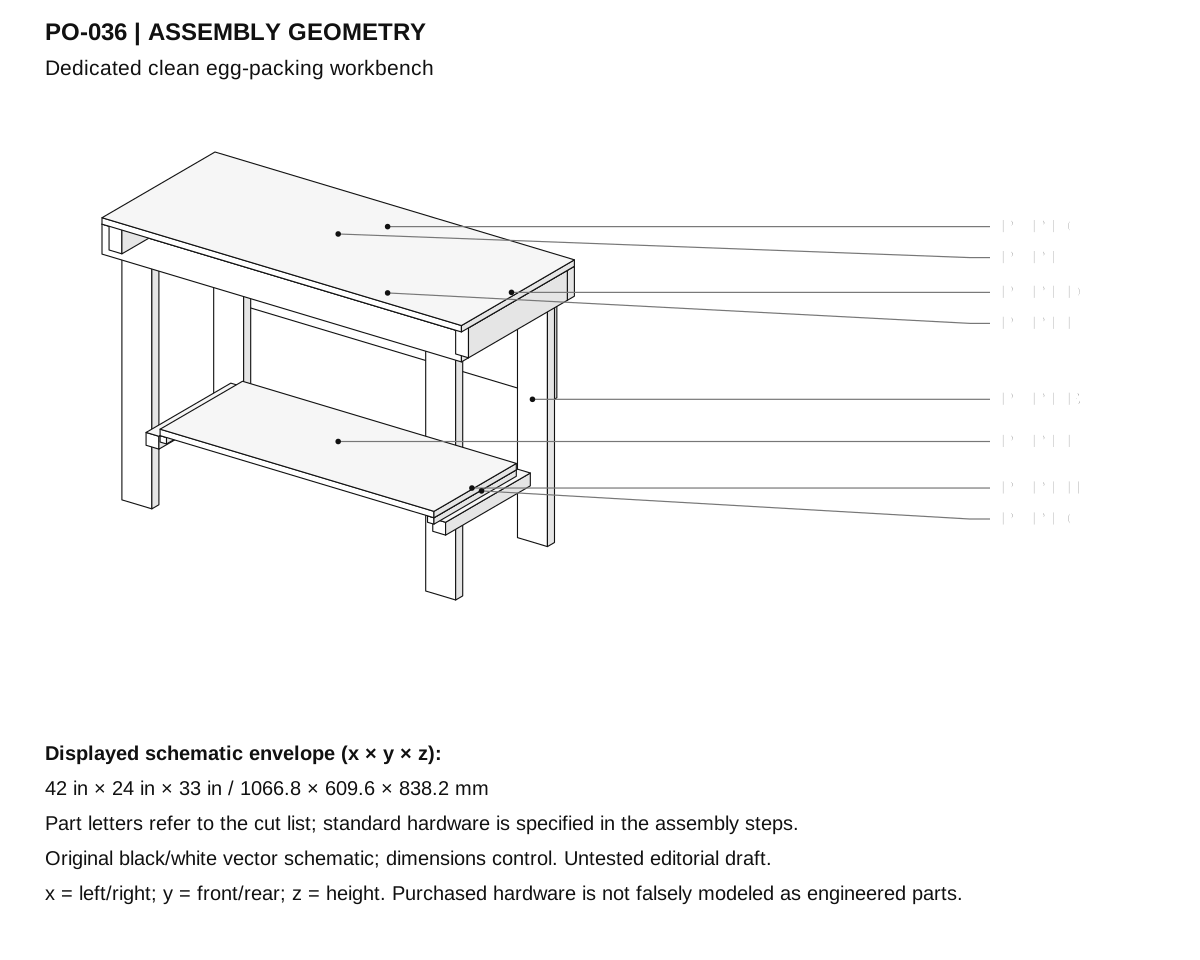
- Select a dry level clean-side room. This workbench is for egg packing in closed cartons; it is not a stool, food-processing sink or a sanitizing appliance.
- Cut A 42 × 24 in from 3/4 in ply; cut four B legs 32 1/4 in from actual 1 1/2 × 3 1/2 in stock, and C aprons 42 in long.
- Cut two D end ties 21 in long, actual 1 1/2 × 3 1/2 in. Clamp C/D into a 42 × 24 in top ring, with D between the aprons.
- Drive two #10 × 3 in screws through C into each D end, eight total. Keep the ring square before introducing the legs.
- Place B inside the ring, left leg x = 1 1/2–5 in and right x = 37–40 1/2 in; front/rear faces occupy y = 1 1/2–3 and 21–22 1/2 in. Clamp all tops flush at 32 1/4 in.
- Through-bolt each leg to its adjacent apron with two 1/4 × 4 in bolts, washers and locking nuts. Stagger the pair vertically by 1 1/2 in and keep holes centered on the leg width.
- Cut G shelf supports to 18 in from 1 1/2 in square stock. Fit between the front/rear leg inner faces at y = 3–21 in, with their top faces at z = 8 in, using two #10 × 3 in screws into each leg contact.
- Cut F 32 × 17 1/2 in and rest it between G at x = 5–37 in, y = 3 1/4–20 3/4 in. Fit H 17 1/2 in cleats along the inside G faces with eight 1 1/4 in screws total, then screw F to those cleats with three 1 1/4 in screws per side.
- Cut E rear racking panel 39 × 12 × 1/2 in. Attach at x = 1 1/2–40 1/2 in, directly to the back-leg rear faces at y = 22 1/2 in, from z = 16 3/4 to 28 3/4 in, with four 1 1/4 in screws into each back leg, eight total, centered at x = 3 1/4 and 38 3/4 in. All holes land in solid legs.
- Place A over the frame, mark leg/apron positions and attach with twelve #8 × 1 3/4 in screws into aprons. Keep heads flush and away from carton contact.
- Fit a removable washable work mat with no loose curling edge. With the bench empty, check floor contact, diagonals, capped bolt ends and absence of rocking; stop if the structure racks.
- Use only for light clean egg-packing supplies; keep cartons closed and clean. Inspect joints and the underside regularly and keep dirty tools, feed dust and chemicals elsewhere.
Checks
- Top ring is 42 × 24 in; actual legs are inside, not between the end ties.
- Shelf support/cleats must contact F; front-to-rear panel/leg contacts are checked before fastening.
- Top is 33 in above the floor, level and smooth; no person may stand or sit on it.
- No payload, food-contact certification or floor/anchor design is inferred.
Cleaning and maintenance
- Inspect before each use for splits, loose joints, protruding points and trapped debris.
- Remove accumulated litter or manure promptly. When cleaning is needed, move birds away, remove debris first, wash and use only a suitable label-directed product if disinfection is indicated; let the item dry before return.
- Recheck the fit after seasonal wood movement. Replace cracked panels, rusted fasteners or frayed liners instead of concealing damage.
- Sand accessible edges to a small smooth radius. Use a removable washable contact liner where specified. Any optional coating must be suitable for the intended animal-equipment use and fully cured according to its label before installation. Porous wood is not represented as a disinfectable food-contact surface.
Primary context
These sources inform the context and do not endorse the original construction design.