Workshop · WS-004
Sharpening-stone sliding cradle
Keep one measured hand-sharpening stone from sliding on a workbench.
Editorial construction draft. Original digital diagrams; no physical build or load certification. Read dimensions, fit and use limits before making changes. US customary dimensions control; metric values are references.
Before marking and cutting
- US inches; feet where appropriate. Metric values are rounded references. Written inch values control.
- 3/4 in means measured 0.750 in actual thickness wherever used. Recalculate mating lengths for other sheet thicknesses; do not substitute nominal stock blindly.
Use limits
- For the bounded stated manual task. Do not install it on a powered machine or use it to replace a guard.
- No load, measurement-certification or protective-equipment claim.
Materials and cuts
| Part | Qty | Size to cut | Material |
|---|---|---|---|
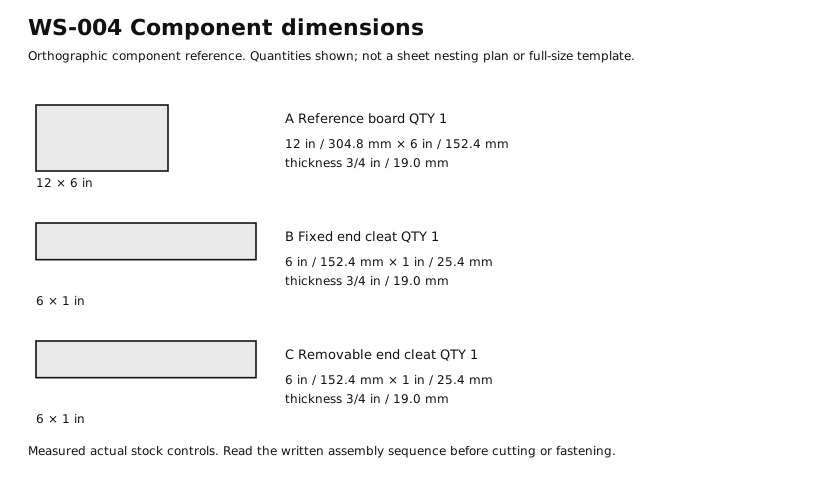
| A Reference board | 1 | 12 × 6 × 3/4 in 304.8 × 152.4 × 19.05 mm | Exterior-bond birch plywood, smooth sanded faces; no preservative treatment. Measured actual thickness 3/4 in. |
| B Fixed end cleat | 1 | 6 × 1 × 3/4 in 152.4 × 25.4 × 19.05 mm | Clear solid hard maple, straight grain along the listed length. Measured actual thickness 3/4 in. |
| C Removable end cleat | 1 | 6 × 1 × 3/4 in 152.4 × 25.4 × 19.05 mm | Clear solid hard maple, straight grain along the listed length. Measured actual thickness 3/4 in. |
Hardware and consumables
- 4 × Compatible wood screws. Selected length, pilots and locations are stated in the instructions; test on actual scrap.
Tools
- Rule with fractional inches
- Pencil or appropriate material marker
- Reliable square
- Saw suited to the specified stock
- Clamps
- Abrasive and dust-removal brush
- Drill with the specified bit and depth stop where needed
- Driver matching selected fasteners
Assembly
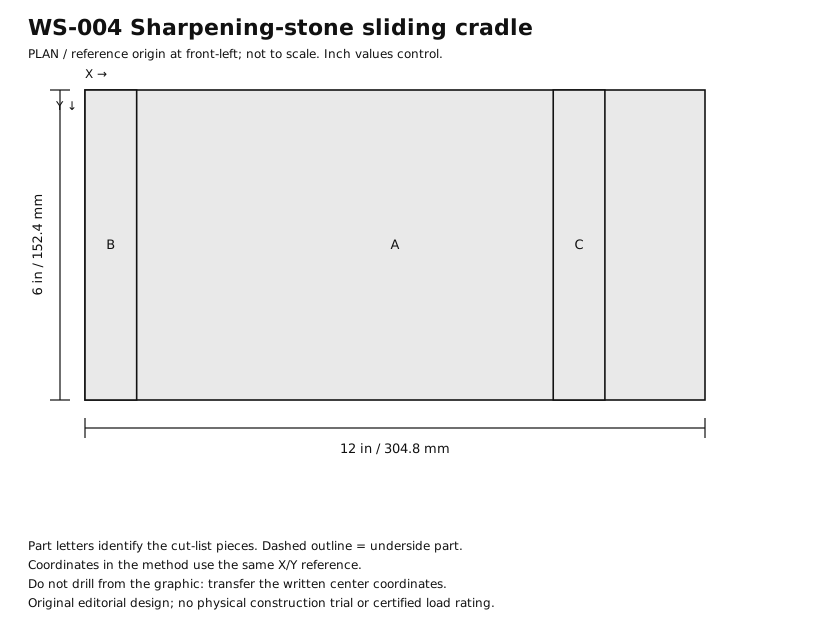
- Use an 8 × 2 in hand stone as the example; measure its actual body before proceeding. This cradle locates a stone and does not prescribe a sharpening angle.
- Cut A to 12 in / 304.8 mm by 6 in / 152.4 mm from flat measured 3/4 in stock. Mark one face UP and mark front-left X0 Y0; remove only the splinters, not the reference edges.
- Draw the centerline and attachment footprints from the part positions below. Measure from the reference faces each time; do not add a chain of rounded conversions.
- Cut B and C each 6 × 1 × 3/4 in. Their 6 in length runs along Y. Lay B across the left end of A at X = 0–1 in, Y = 0–6 in.
- Rotate C to run across Y as well. Locate it at X = 9 1/16–10 1/16 in for an 8 in stone plus 1/16 in length clearance between the inside cleat faces.
- Dry-fit and clamp the assembly on a stable surface. Check the intended article against the clearances before drilling or gluing; correct the layout on paper if it does not fit.
- Fit B from below A using two #8 × 1 1/4 in screws at X = 1/2, Y = 1 and 5 in. Drill clearance through A and centered pilots into B.
- Ease exposed corners and all edges that the operator will touch. Remove dust and any projecting point; countersink only to a flush head.
- For C, mark two holes through A at X = 9 9/16, Y = 1 and 5 in. Fit two identical screws from beneath; leave removable without stripping the pilot holes.
- Center the stone across Y = 3 in. If its body rocks, correct the supporting surface or use the stone maker’s supplied base; do not wedge a cracked stone.
- Clamp A securely to a bench outside the knife path. Use the lubricant specified by the stone manufacturer and keep electrical tools away from the wet area.
- Perform one slow hand sharpening pass with fingers away from the edge. Stop if the stone slides sideways; this two-cleat version requires a sound flat nonslip support supplied by the stone maker.
Checks
- Inside end gap 8 1/16 in for the stated stone; C coordinates must be remade for another actual stone.
- The stone seats flat without length binding; no cleat screw reaches the stone contact surface.
- Assembly is flat and free of splinters, exposed tips and loose parts.
- A second operator can repeat the intended light-duty operation without being coached.
Cleaning and maintenance
- Brush or wipe the unloaded assembly clean after use.
- Inspect attachment fit and fasteners before each new task.
- Replace a damaged contact surface; recheck the reference dimensions after repair.
Primary context
These sources inform the context and do not endorse the original construction design.